Fixing an Old Farmhouse – The Kitchen

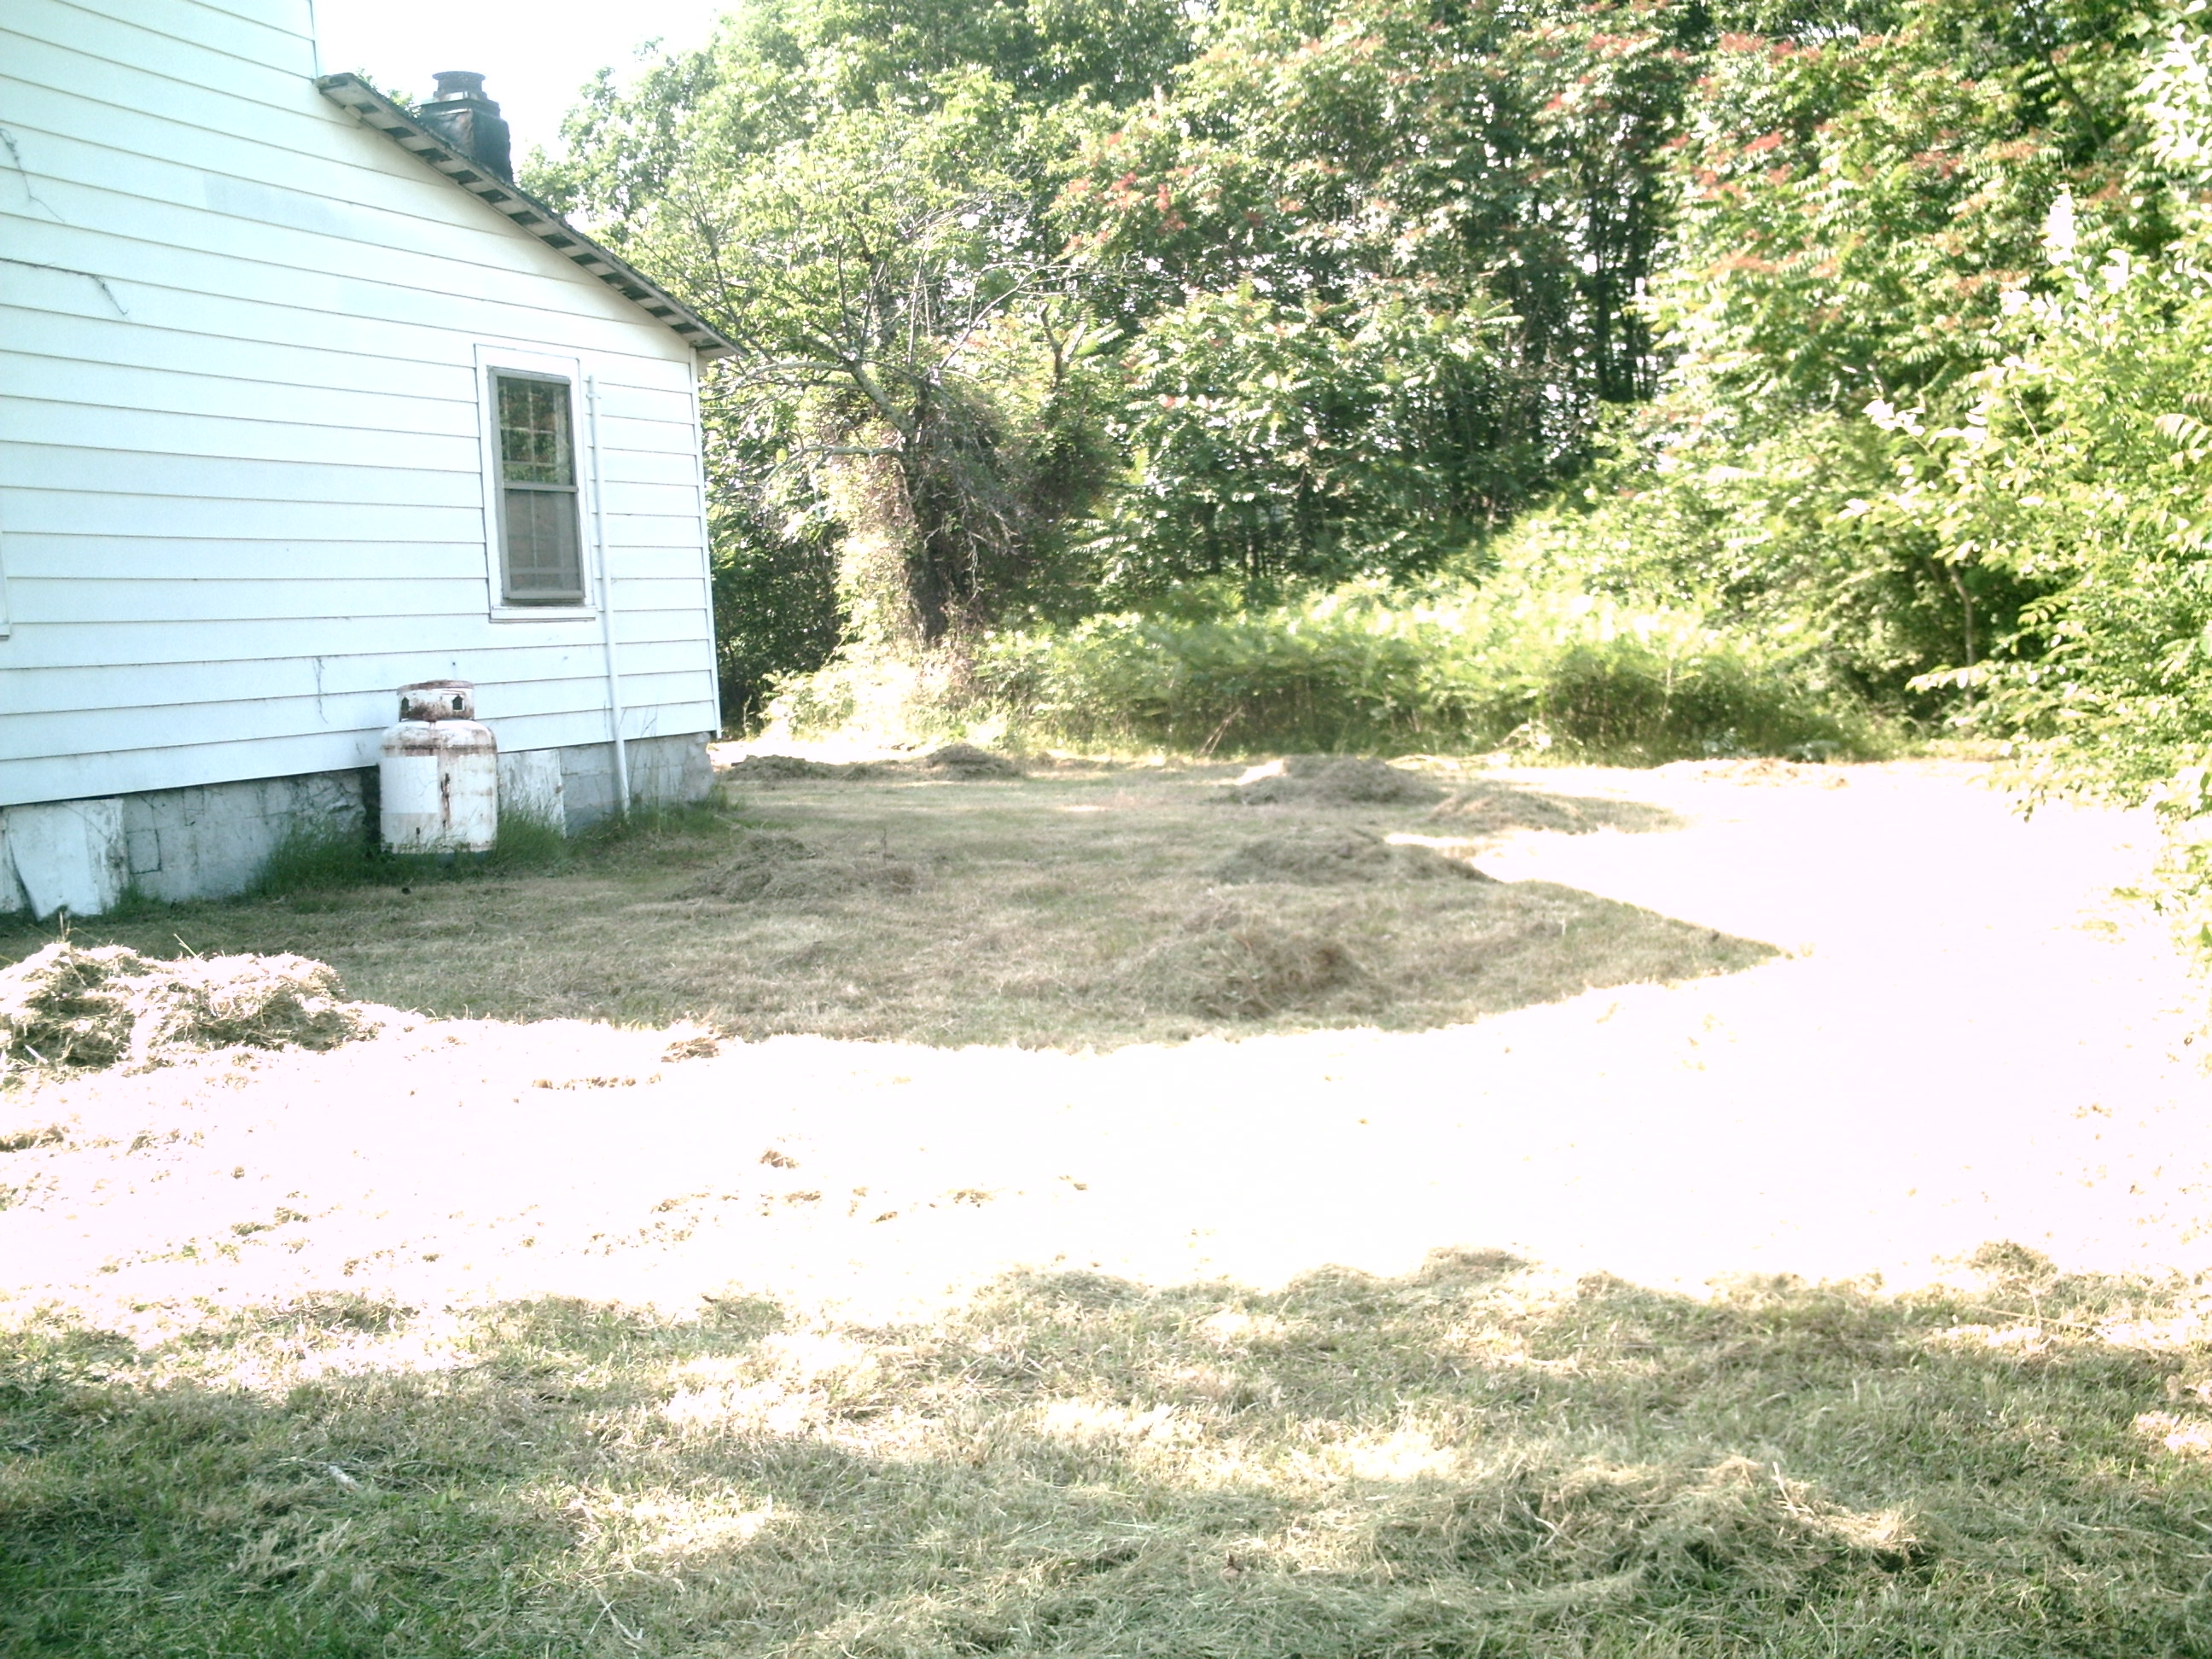
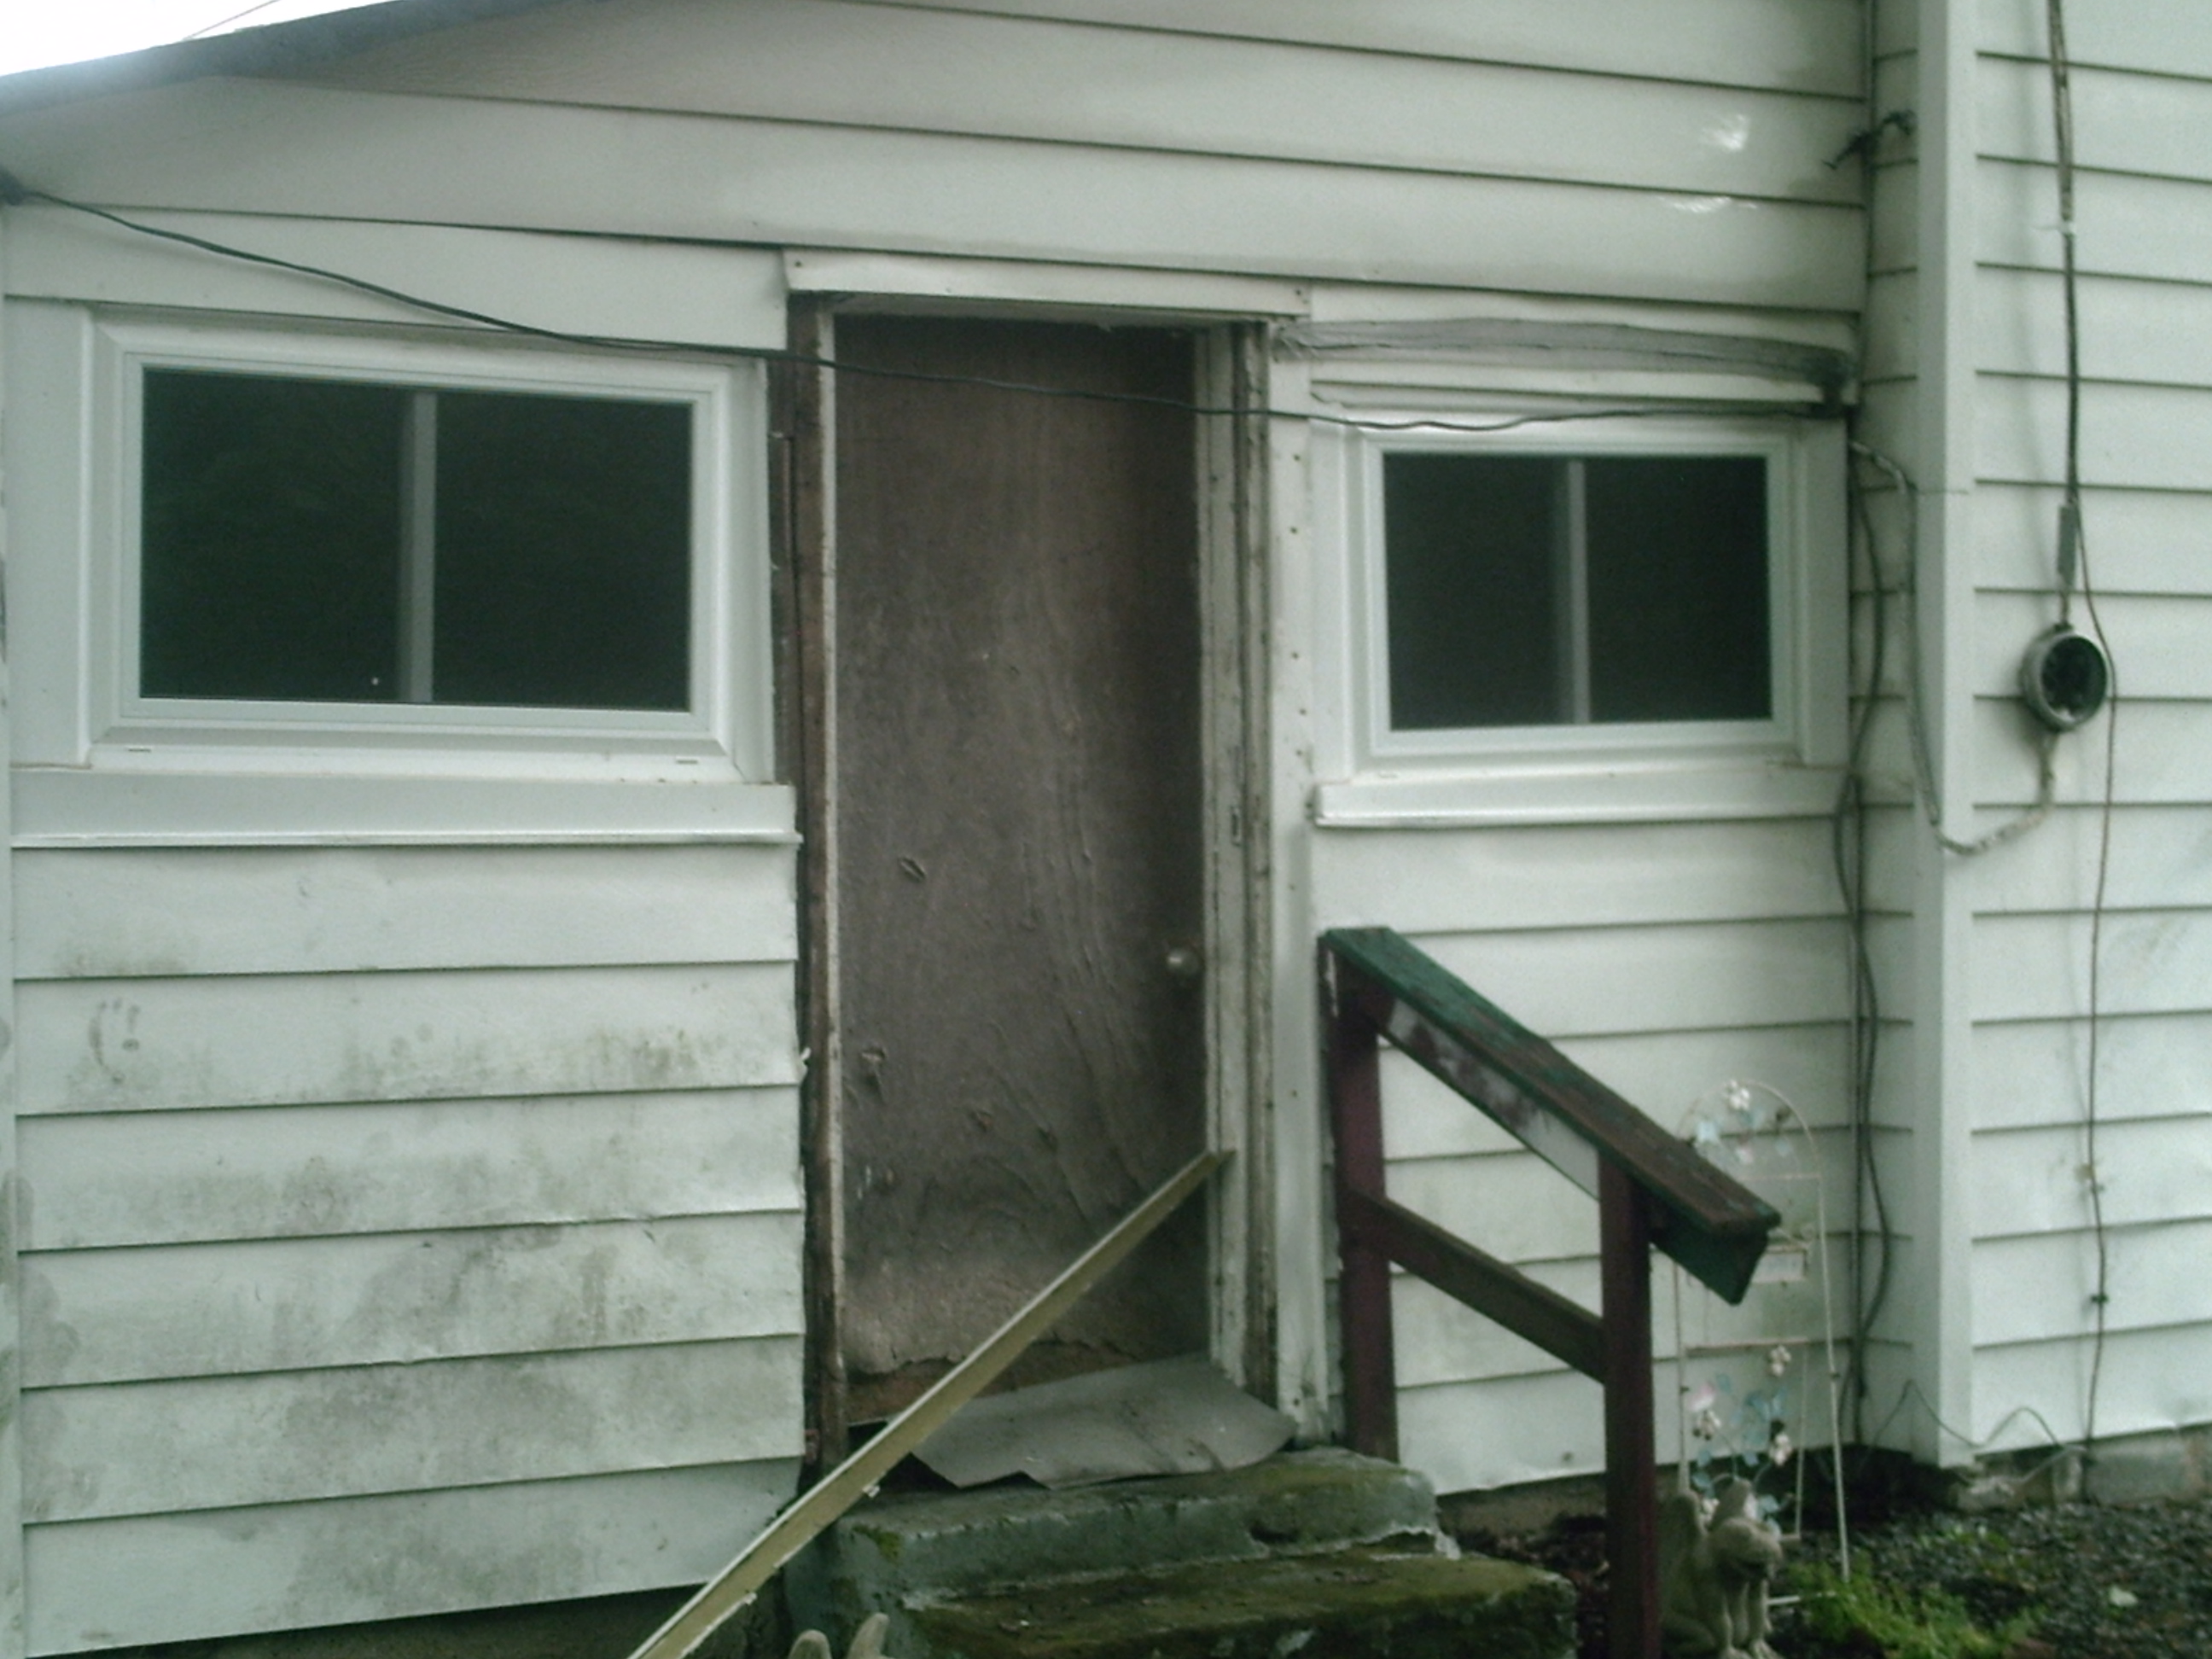
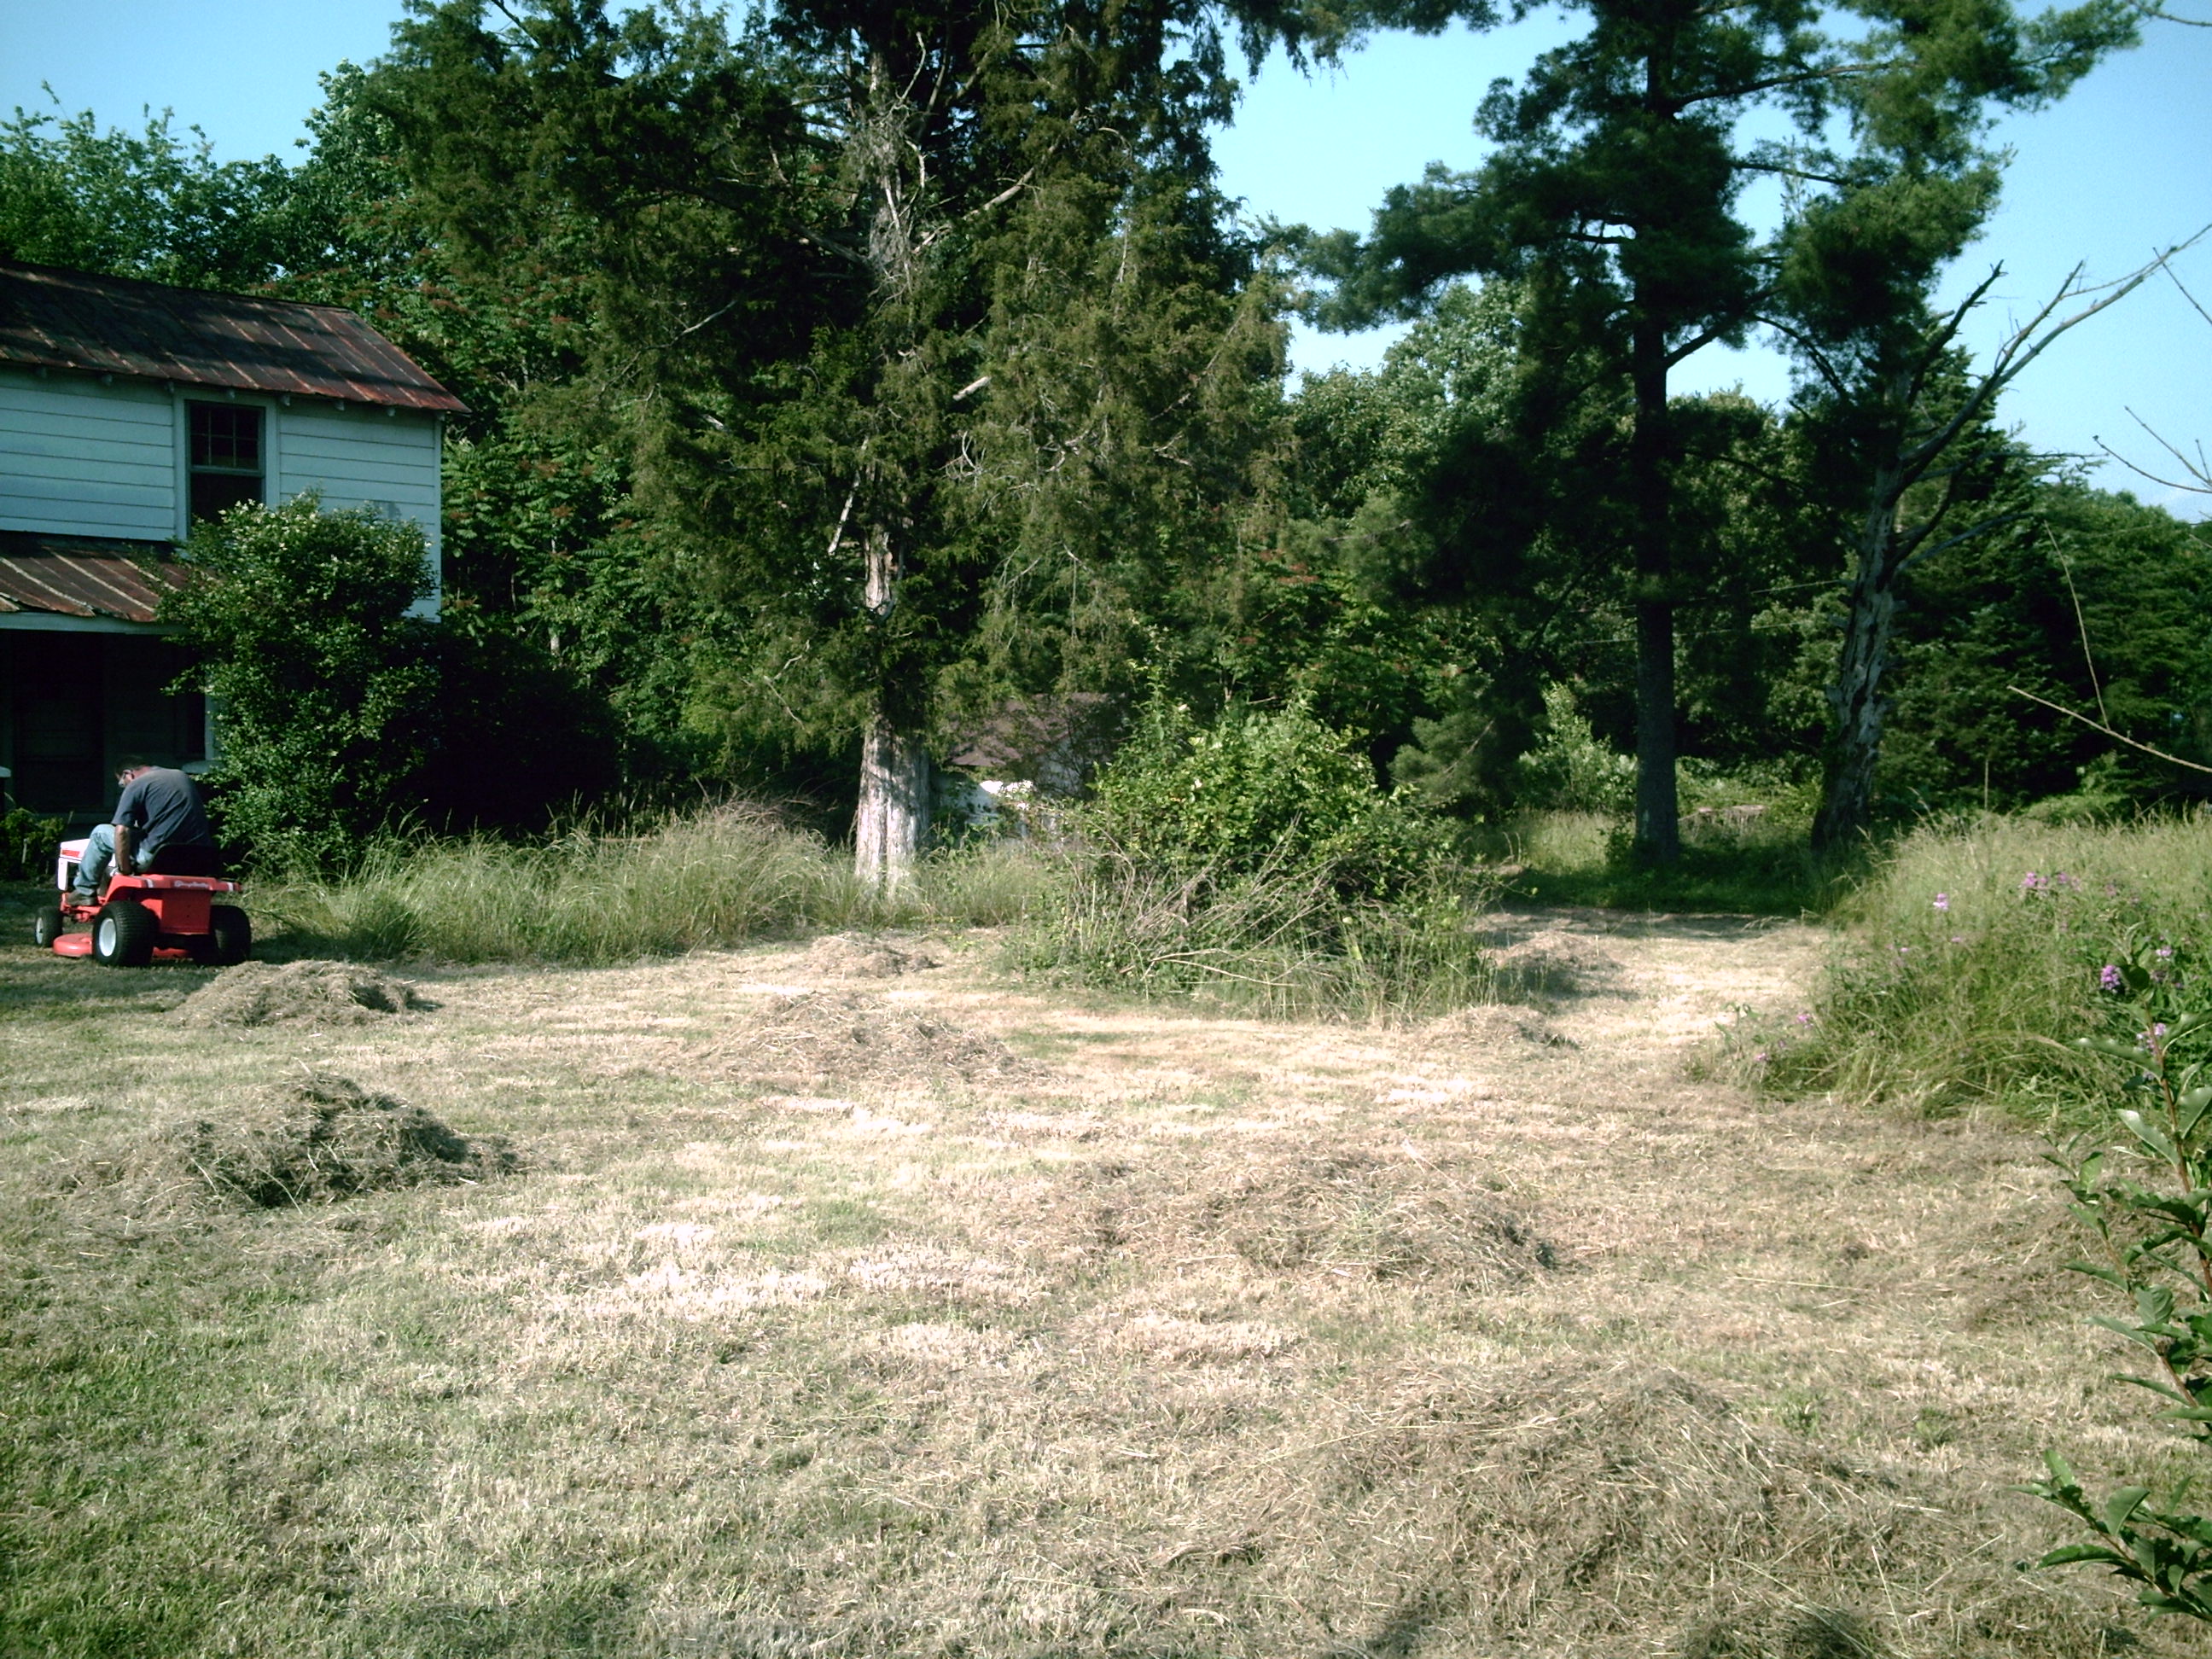
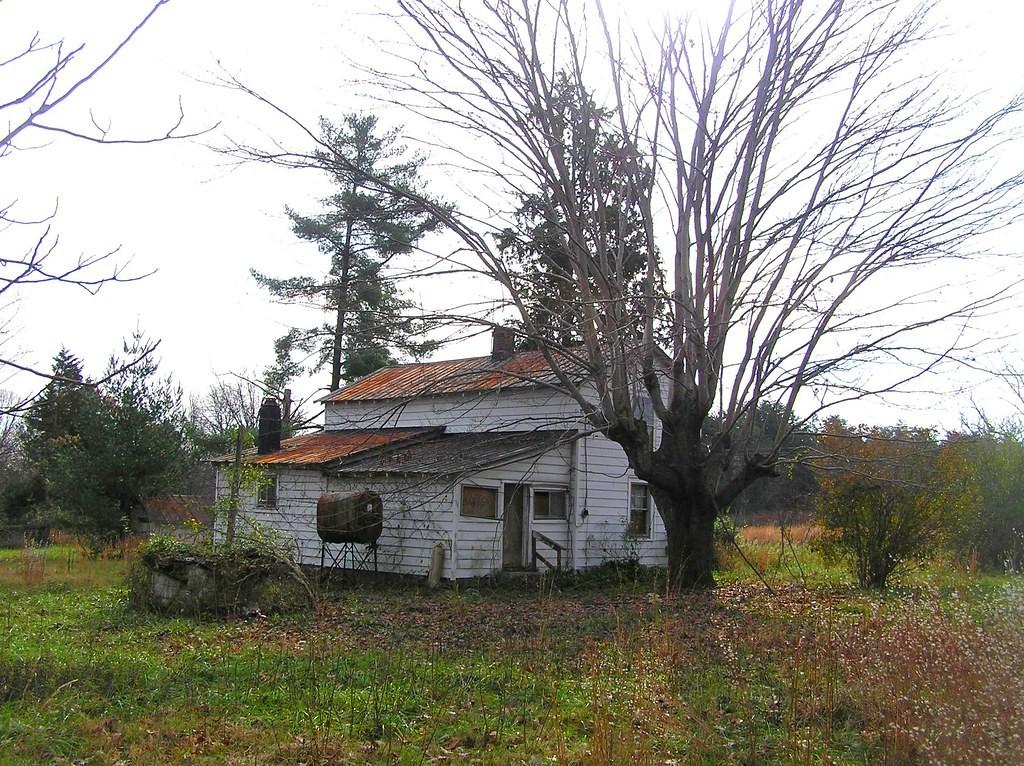
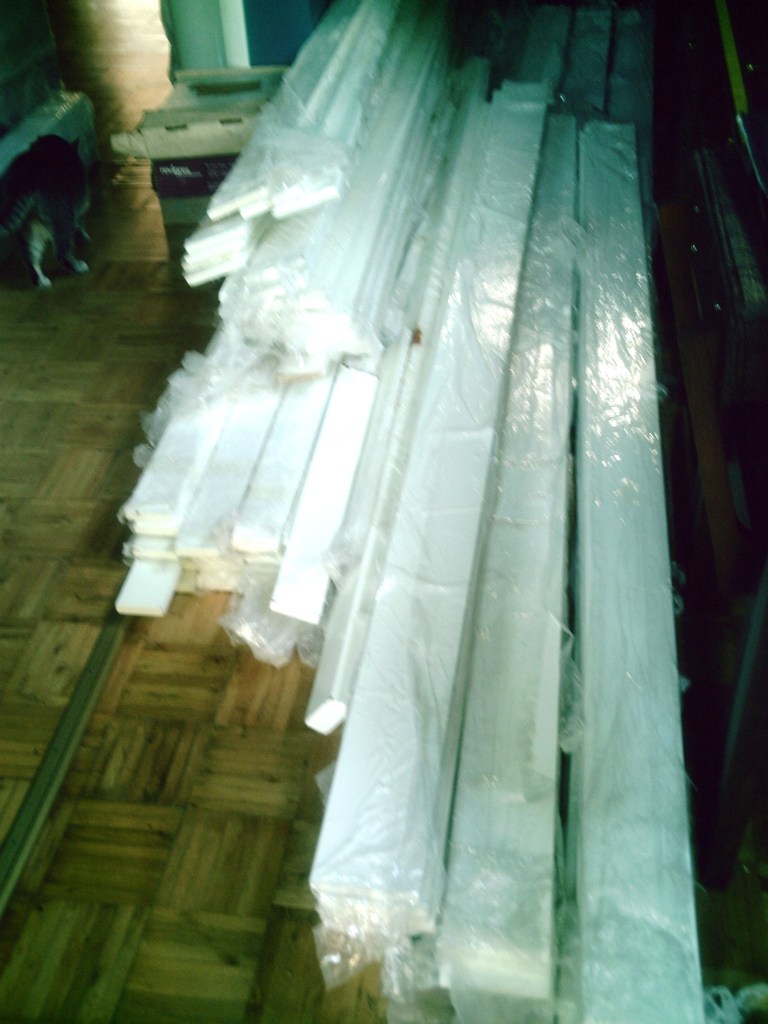
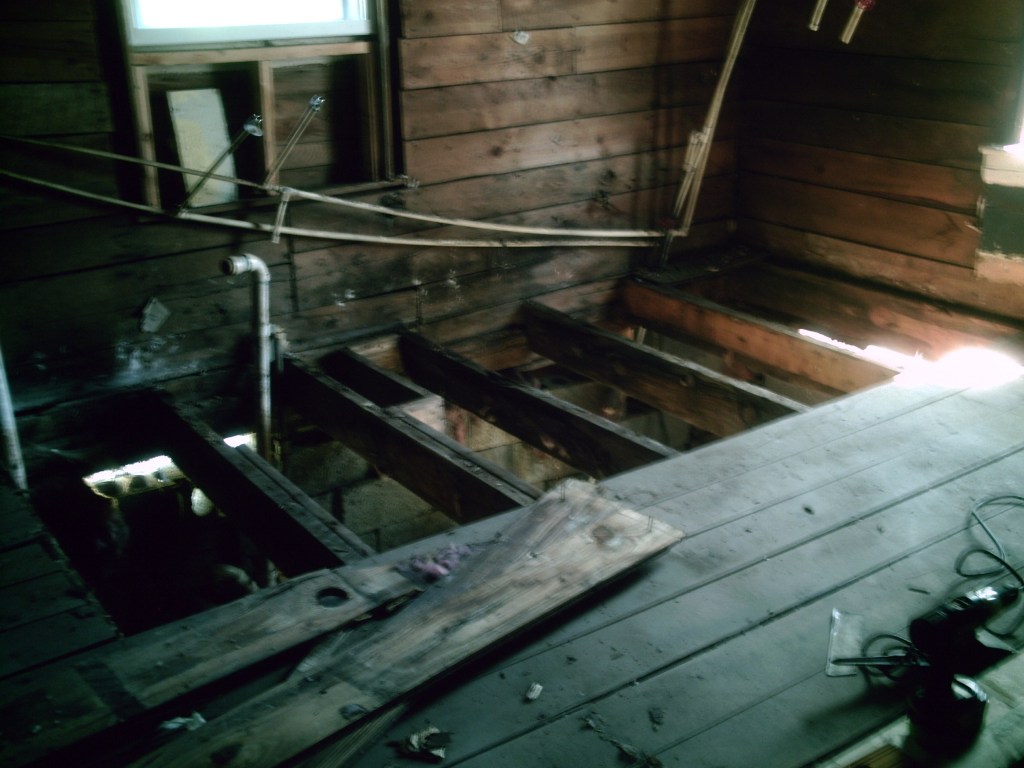
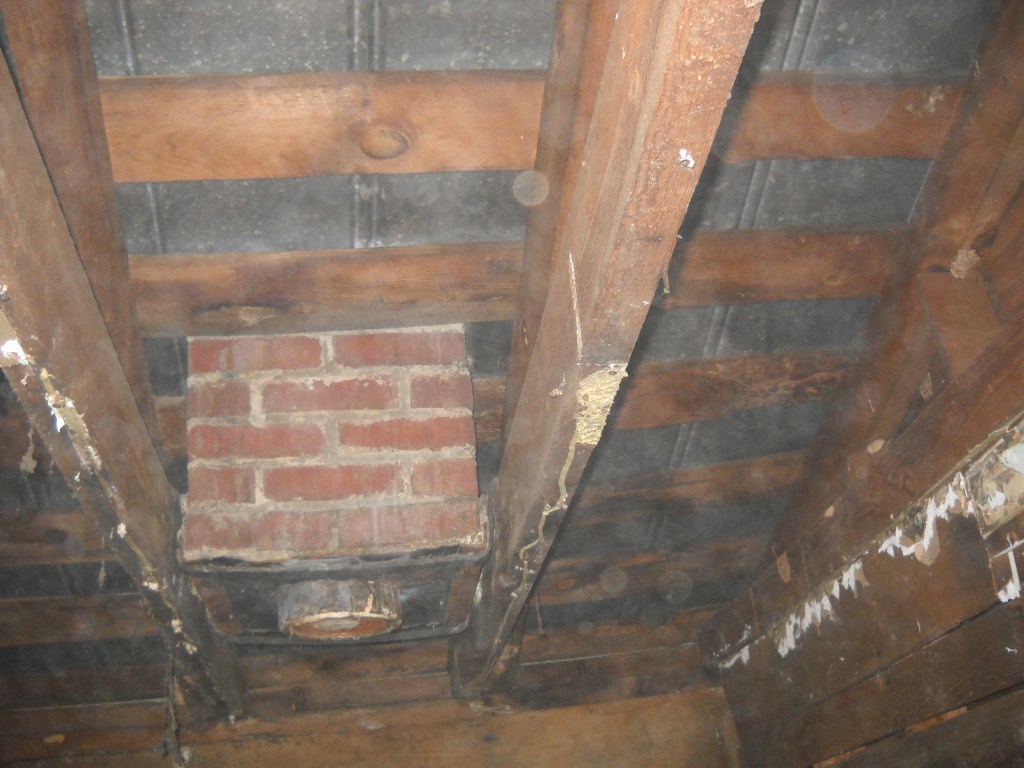
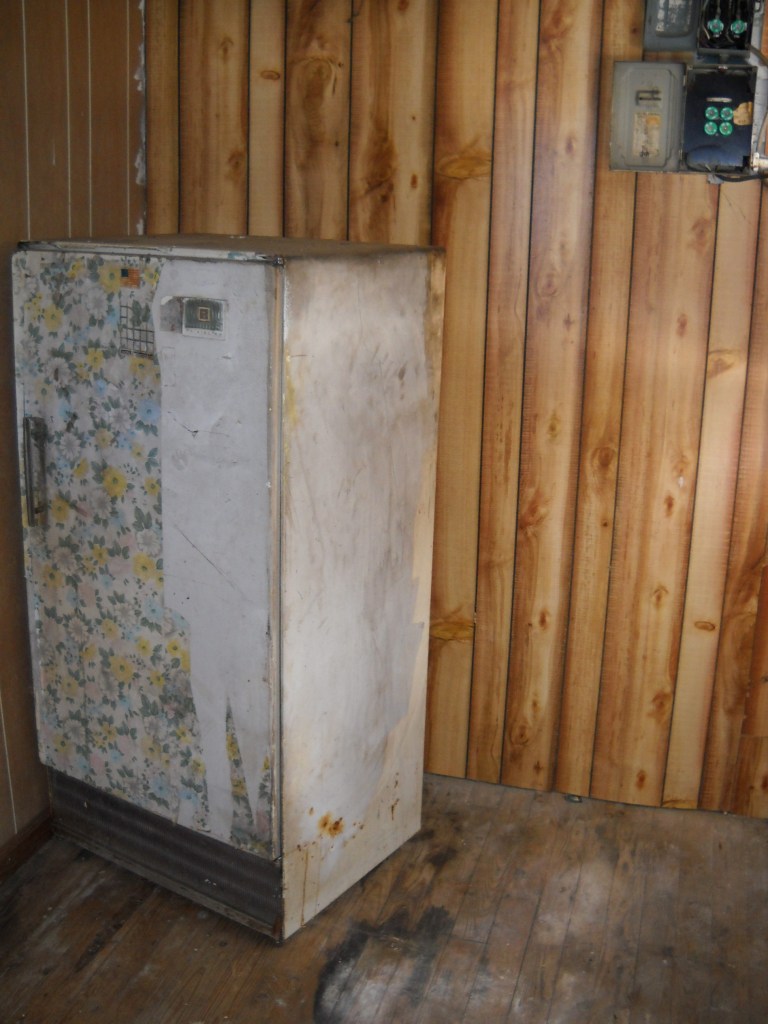
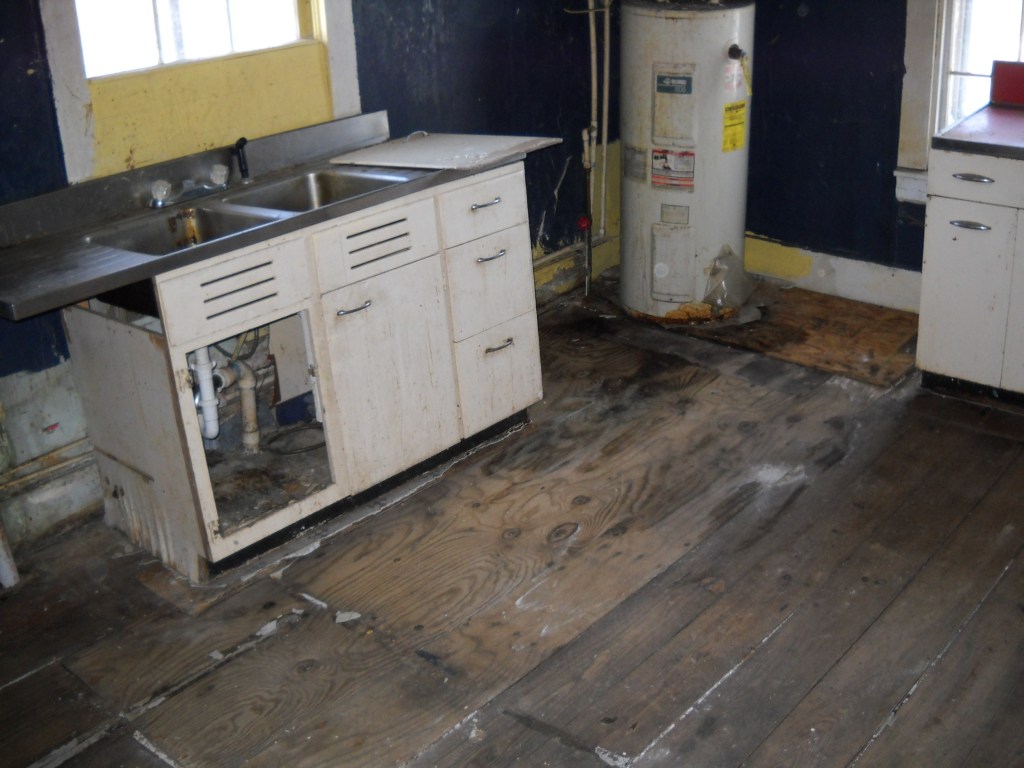
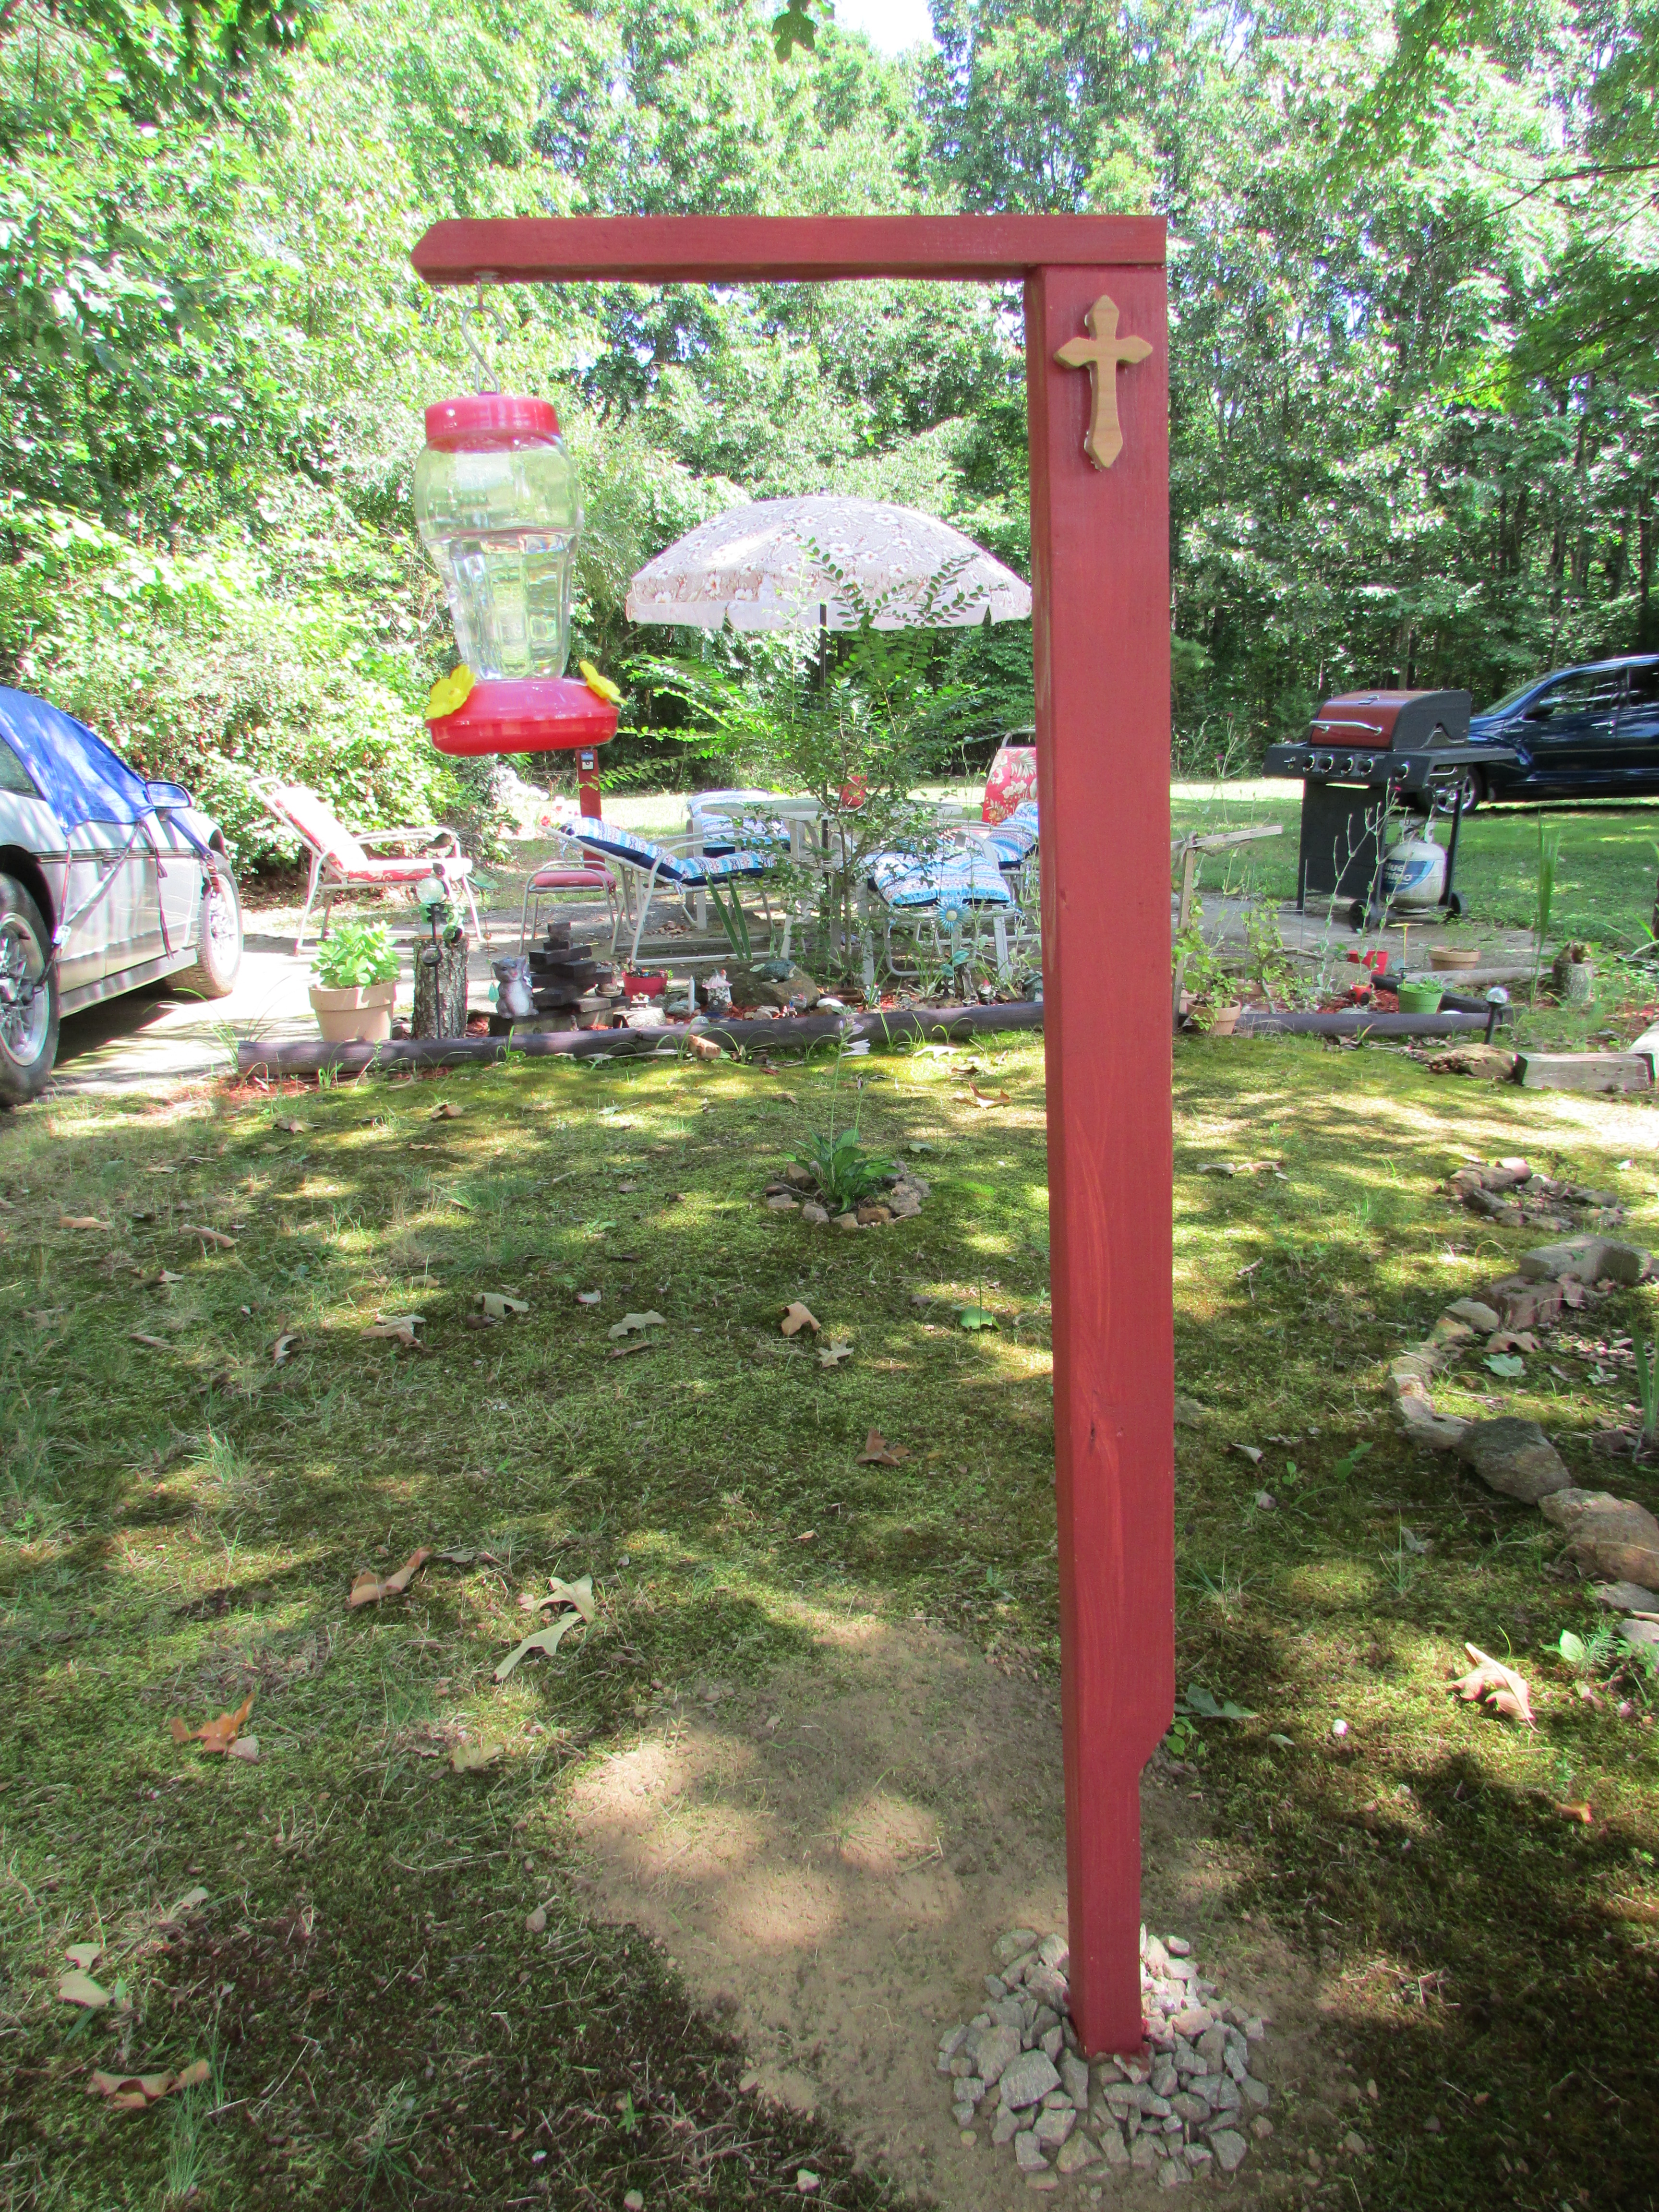
Fixing this 1910 old farmhouse has not been easy. It has required a budget, vision, stamina, time, tons of patience, but most important faith. It would have been easier if its condition would have been better, and by better I mean with less destruction and abandonment inside and out. On previous posts, I have given you a glimpse of what we have done so far on the outside, and an idea of what it looked on the inside. Once we disposed of all the garbage and of the entire interior furnishings and fixtures in extremely bad shape, we knew we had to handle the walls, ceilings, and floors, whether taking them off, replacing, or fixing what needed to be fixed. Same process was applied to everything else that had to be done. We were discovering issues as we worked. After that, we gave the place a good cleaning, inspected the wood beams and the walls for any signs of termites, and amazingly there was no termite damage at all. The house was built from cedar and possibly another insect resistant wood according to the home inspector. We called in an exterminator to inspect and spray the entire interior, and to apply a termite treatment inside and outside, just in case. Once that was done, we could start the work inside the house. It took us 7 months to complete the interior, but fixing the well and hooking up the electricity took longer because we had to wait for an electricity pole (ours disappeared one day), and hire experts for those two jobs. Patience is a virtue. We stayed with my sister and brother in law during that time and traveled over an hour everyday while fixing the house. We will be grateful to them forever for putting up with us and the cats for that long. Again, patience is a virtue. We worked from sun up to sun down and used a generator to power up the tools and anything else that needed to be powered up. Luckily, it did not turn out to be a heavy winter. We packed our lunches everyday.

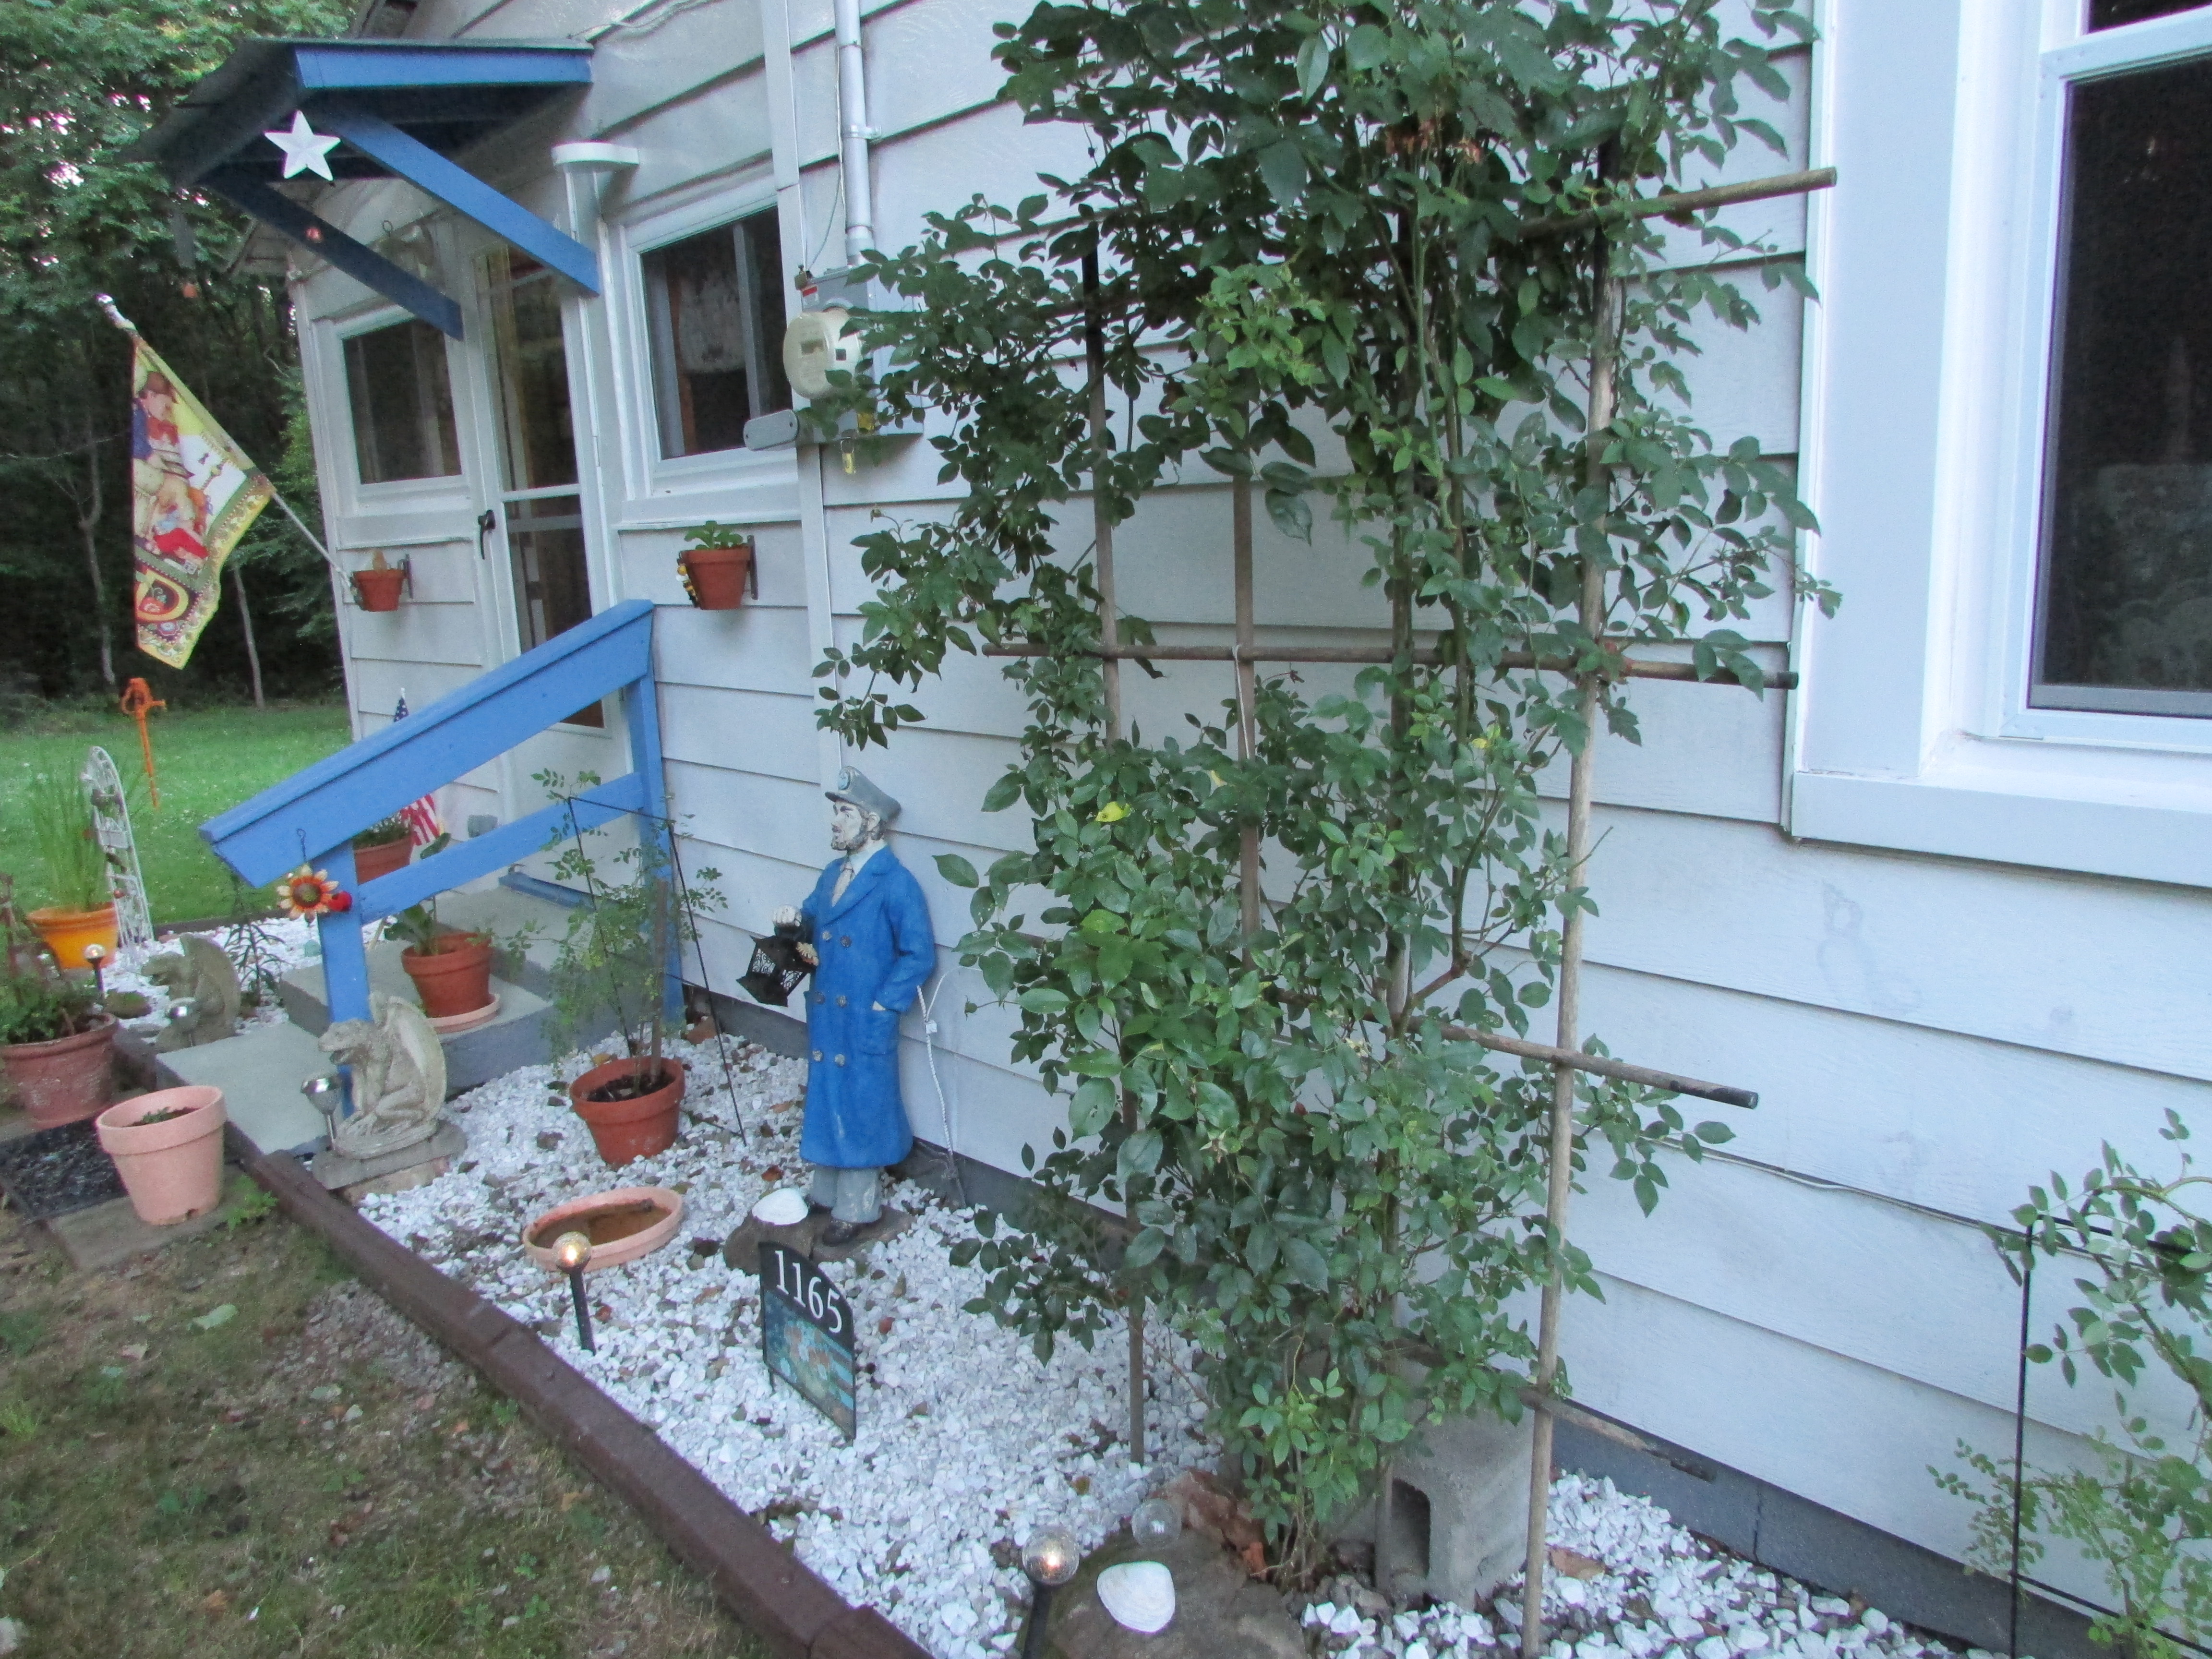
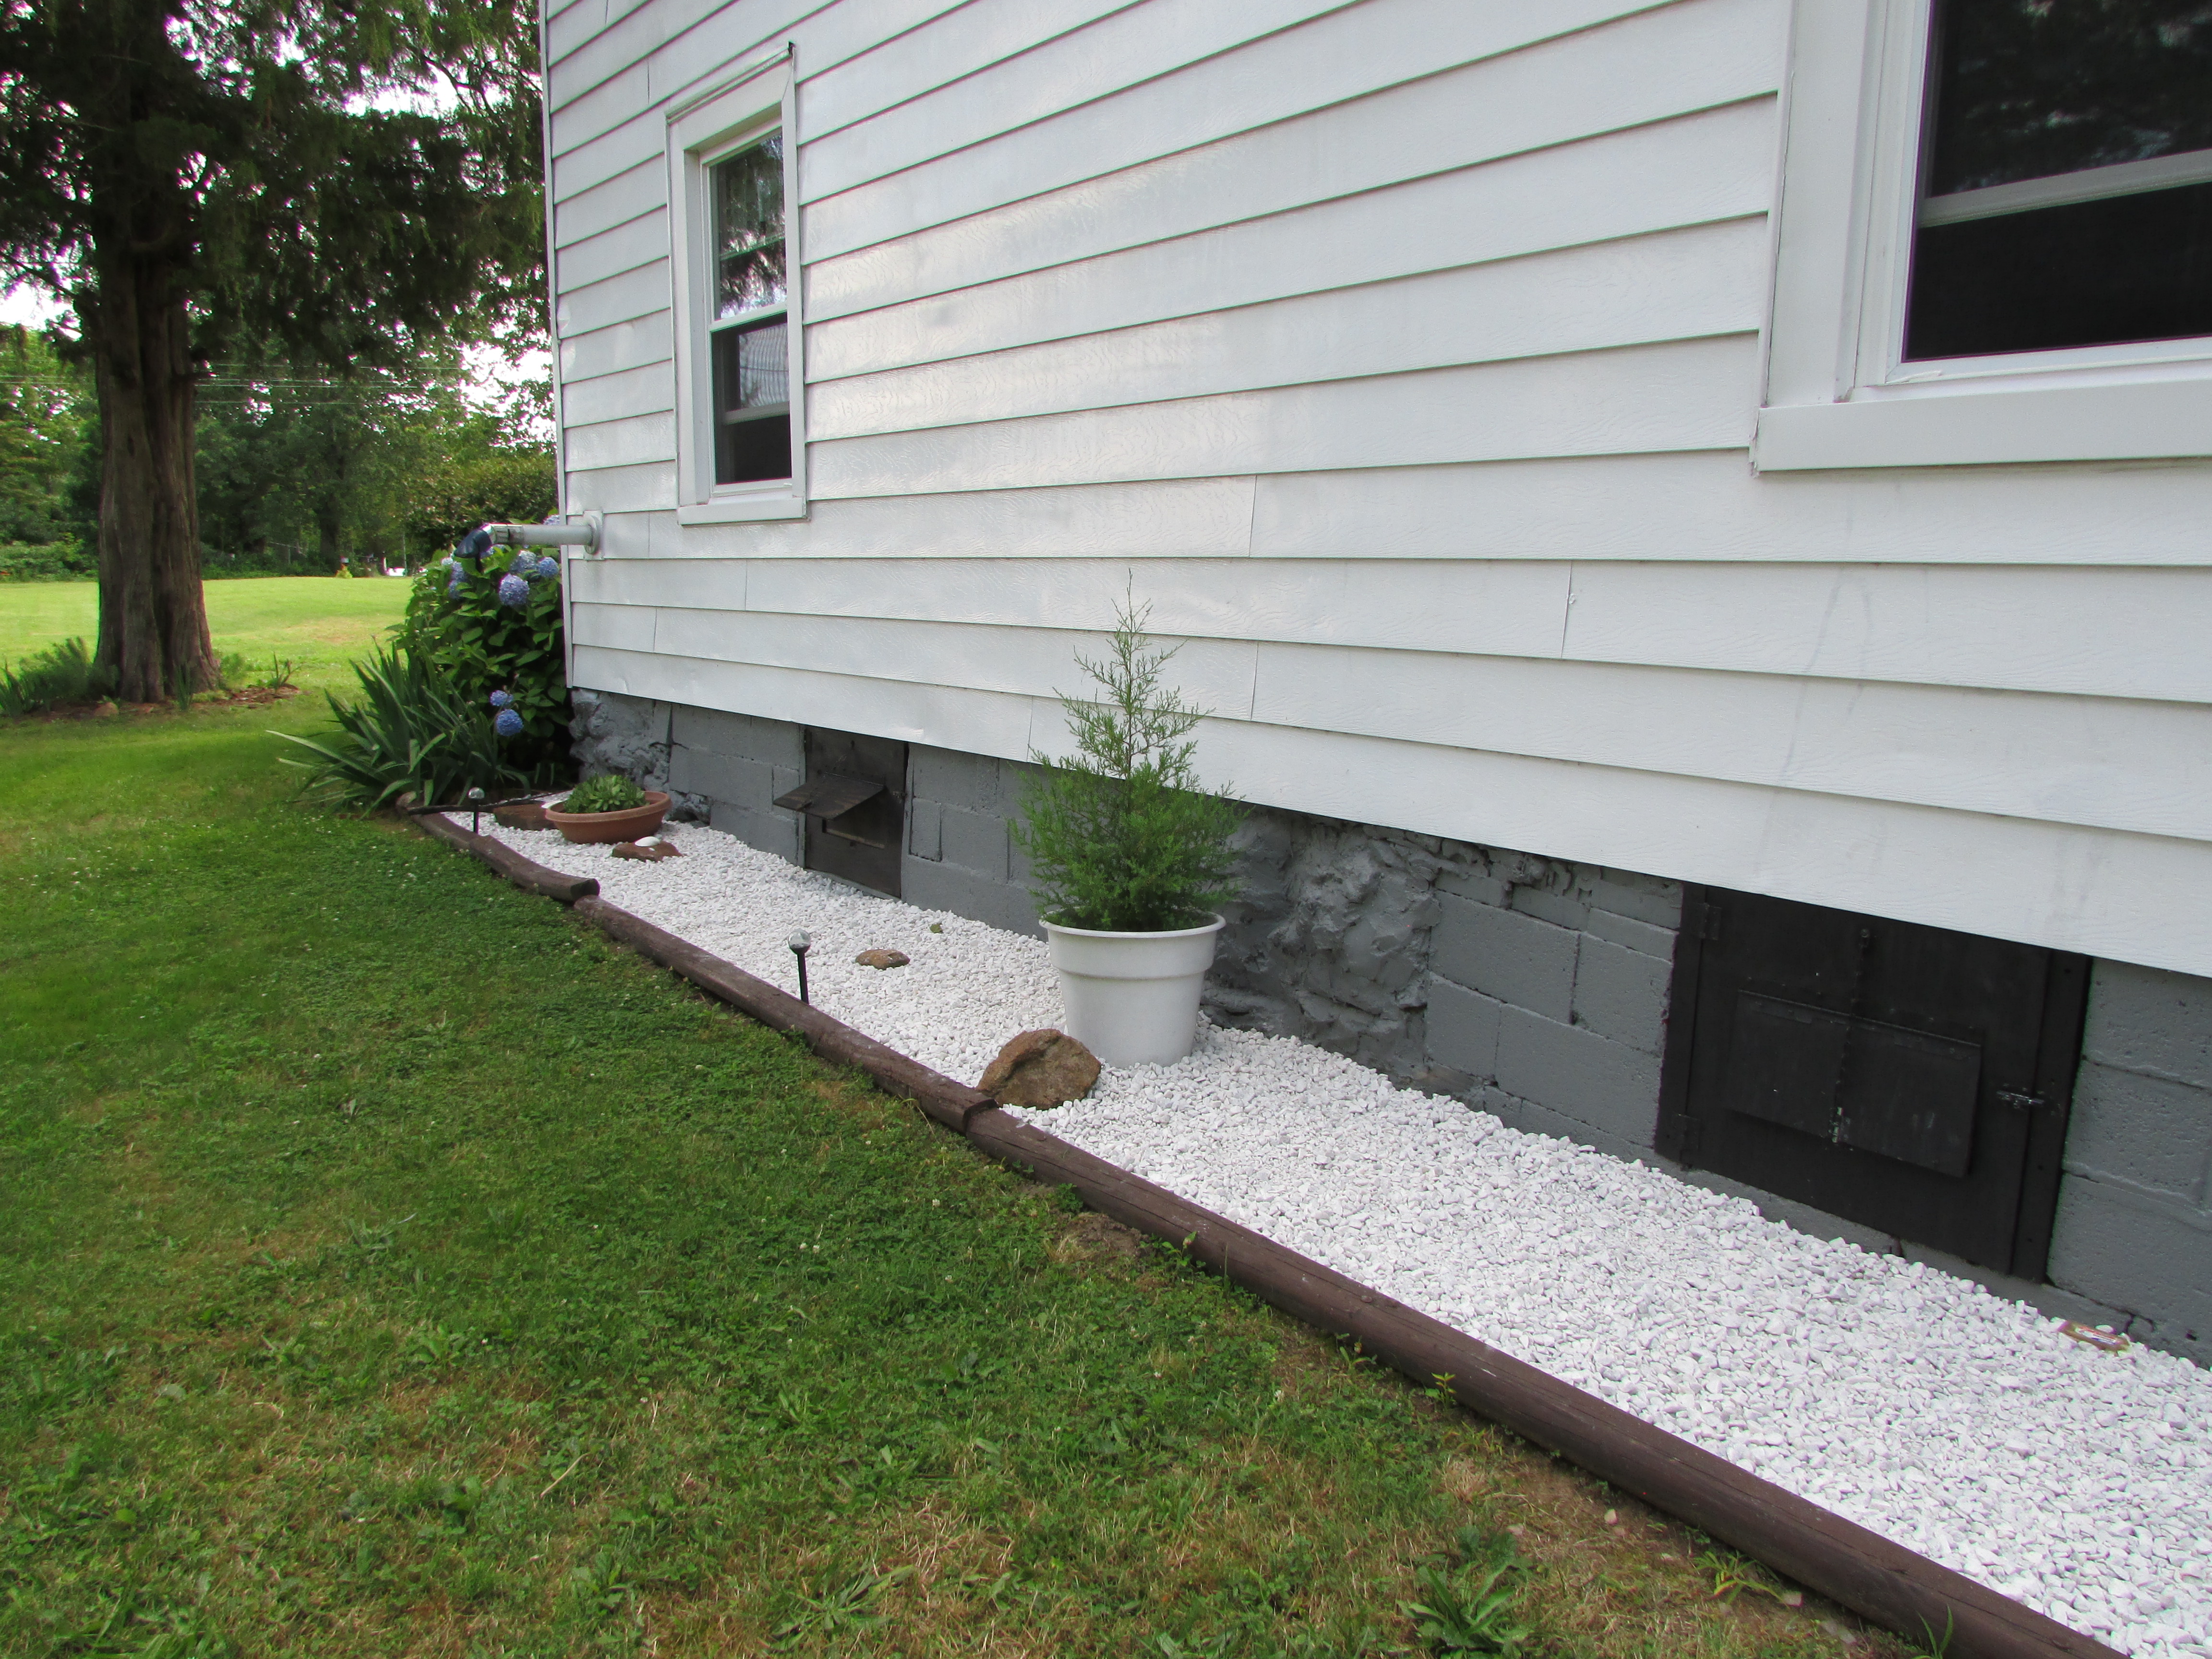
We started our work on the second floor, and worked our way down. One characteristic of this house that made things “easier” is that all rooms measure 15 x 15 feet, except for the tiny bathroom added much later, and the mudroom, which was a side/back porch that the previous owners enclosed; however it is a nice size. I already mentioned on the previous post that we had a small budget and had to be very creative and resourceful with materials. We worked with a variety of materials, from recycled to new, and also used a resource that is sometimes overlooked – contractor’s surplus. It saved us a lot of money. When deciding on the style and feel we wanted to achieve, we decided that we wanted a warm, rustic, back in time, close to early American/colonial feel, but had to work with the materials we already had at hand, and the decorative items we brought with us when we moved. It is a mix of country charm, rustic, and early American. I understand that this might not appeal to everyone, but it is “our style,” so bear with me while you bare with me.

I decided to start with the kitchen, since it is the heart of the home. Here are some pictures of the before and after.

Before doing any work, this was a very important step. These people were awesome.
The kitchen as you can see was in extremely bad shape. The vintage metal cabinets were rusty inside, and could not be saved. The floor had water damage and most of it had to be replaced.
Right side of the kitchen
One thing I regret is not using the metal sink top for an outdoors garden sink application. I wasn’t thinking about it at that point.
Contractor surplus – brand new molding material at phenomenal savings.
Another example of contractor surplus – cabinets and flooring.
Replacing the damaged wood floor boards – water damage. Notice the old construction style on the walls, boards running side to side, that is the actual wall, the sheetrock and paneling were removed.
Matching the new wood planks to the old original ones was tricky, We could have just sand, polish, and stain the wood, but later on decided to install laminated flooring. It gave an extra layer of insulation. Old farmhouses tend to be cold during the winter, and cool during the summer.
The ceiling. The kitchen chimney was removed, and the bricks were reused in the front garden.
During the mess.

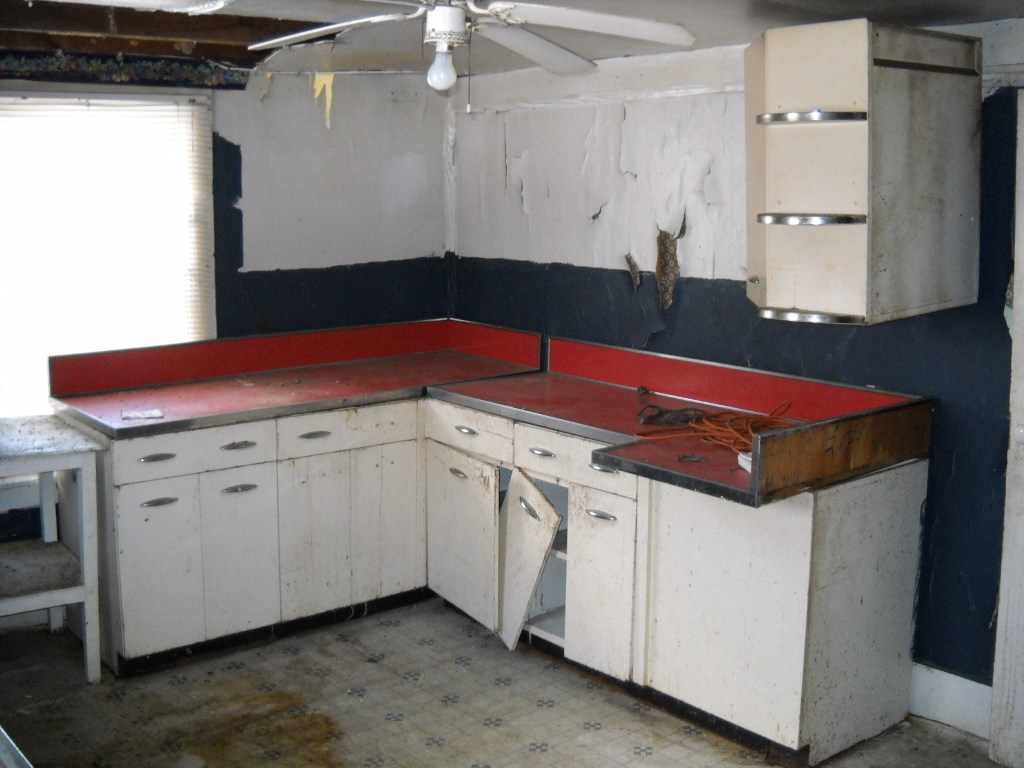
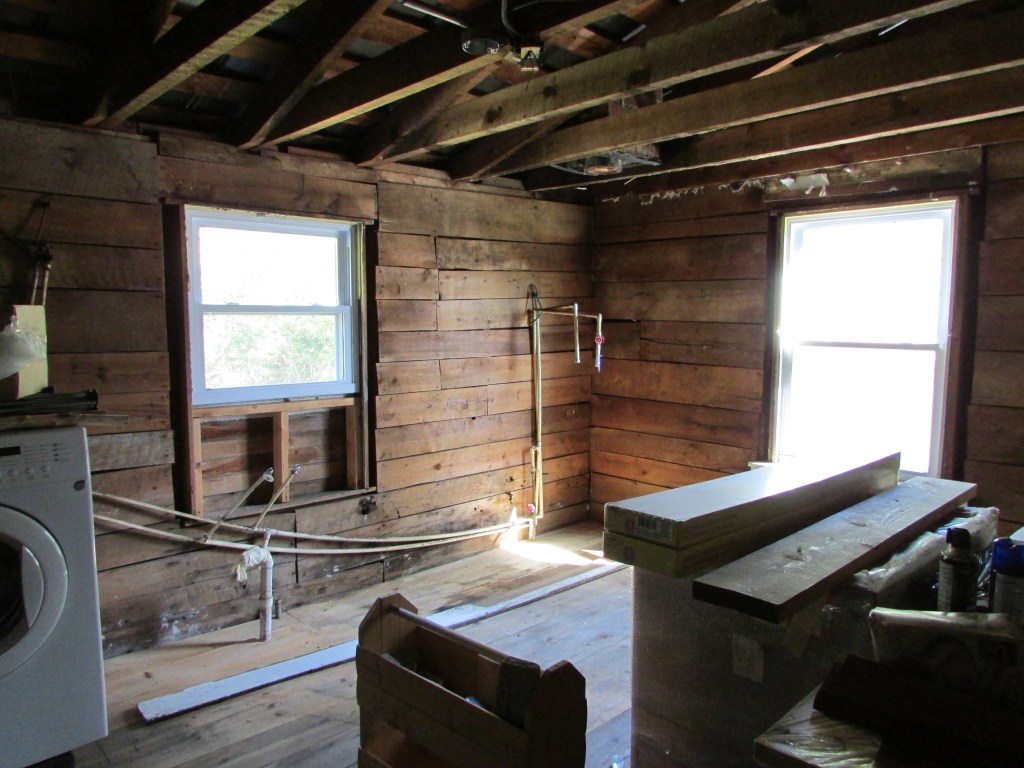
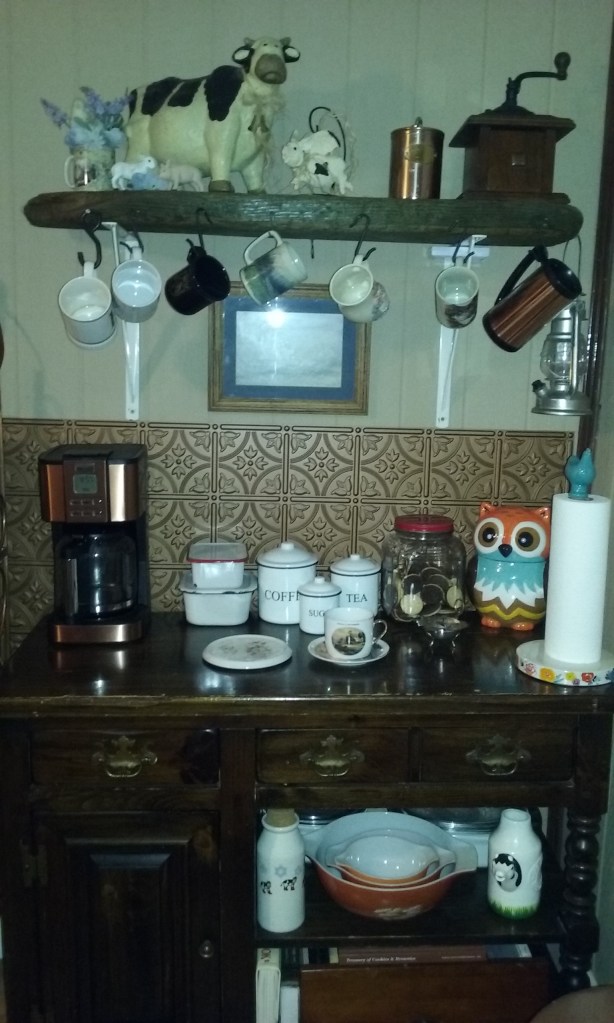
After – The Kitchen as it is today.

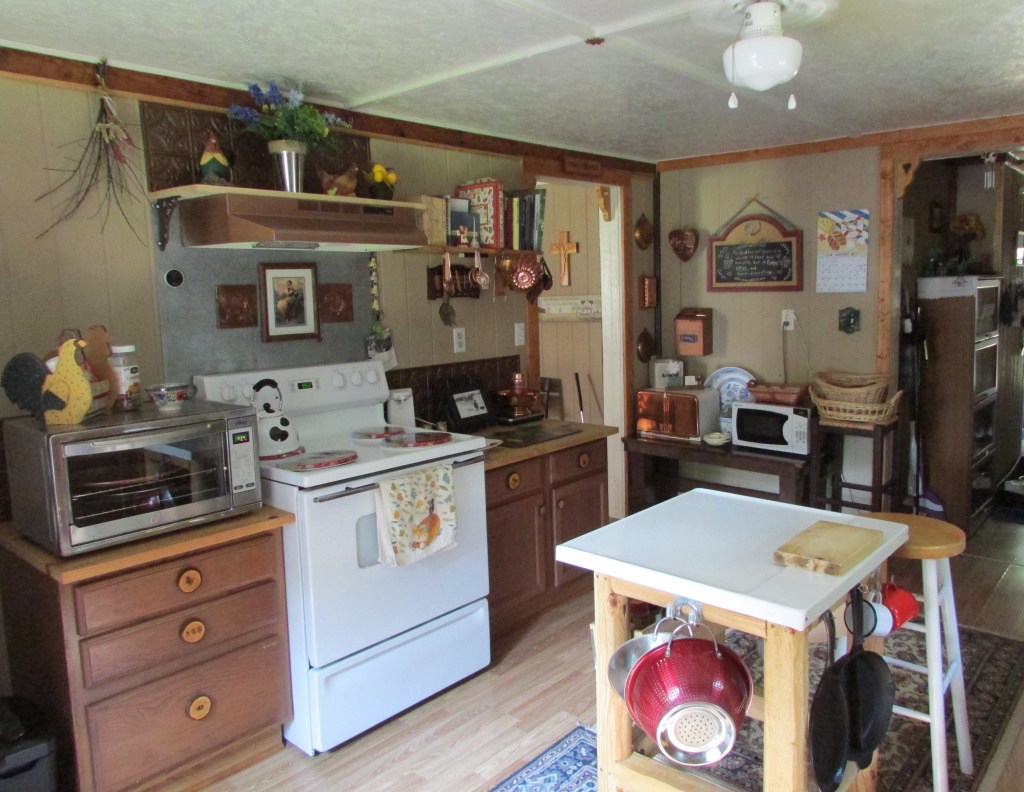
When placing things in the kitchen, we thought about the space we had, but also, the way I cook. I knew it would bother me to have a coffee pot in the same area where I would prepare a meal, so the coffee pot was placed in a corner of the kitchen as a separate coffee station, utilizing an antique French buffet, which also offers extra storage. In the morning, my husband prepares his lunch to take to work in that area while I prepare breakfast on the opposite side, and we are out of each other’s way. Atop that area, we placed a very rustic shelf made of heavy drift wood from the Jersey shore where I lived, a pleasant memory, a memento. Every time I look at it, I smile. I knew I dislike top cabinets so we did not installed those; instead, we put on shelving. As far as cabinets go, we found a great deal from a contractor, and we bought three pieces – one for the kitchen sink, and two for the opposite side in between the location of the stove. We decided to install butcher block counters. My husband made the cabinet knobs for me out of wood. I needed a center table to prep meals, and my husband built one for me – a rustic butcher block where I place things I use often and a spice rack. We installed a fan/light because the house does not have central air conditioning, so there are ceiling fans in every room downstairs. Eventually, we might install a ductless system. A metal sheet serves as backsplash behind the stove and it is a place where to attach a recipe using magnets. Cooking books are kept atop a shelf nearby. For now, the microwave and other things rest on a table my husband built out of recycled materials, however, I am on the look for a sideboard that will serve the purpose in that area. We installed laminate flooring throughout. We installed a double sink, which makes life easier. I am the only person on Earth (probably) that loves washing dishes and finds it relaxing, no need for a dishwasher. I love the scent of the dish liquid and the bubbles floating sometimes in the air, when you squeeze it. I love looking through the window, and the moment makes for perfect “thinking time.” My love of old things and copper dictated the décor. Here are some pictures. Hopefully, you will be transported to another time.

I am not a minimalist and I like old things.
Another view.
The coffee station.

We fixed the home for us, to our liking, not focusing on resale value, although we already multiplied its value four times plus, after valuation. We intend to live here for a long time. I hope you enjoyed this post and that it inspires you to take on a challenging project in the future.

Inside a 1910 Farmhouse

I wasn’t sure how to start this post, which is a natural progression from the outside/garden series of posts, continuing with the “fixing an old farmhouse” series but doing it without the blog posts being too long or too overwhelming for the reader. I will do so room by room, starting with this first post about the overall condition of the farmhouse. If you are familiar with my previous posts, you know that the entire property was abandoned for years and covered in weeds and overgrown vegetation, inside and out, and that it had been left to rot. The inside had been pretty much destroyed by the previous guests, whether human or animal. All kinds of critters had welcomed themselves inside and made all kinds of nests, from birds to wasps, snakes, spiders… There was also a large amount of garbage (scary) and many areas of destruction topped by poor attempts to fix something broken at one point. The large water heater had burst at one point and caused water damage on the kitchen floor, being that, more than half of the wood floor boards had to be replaced. There was also an old refrigerator on what is now the mudroom/cat room, and it had a rotten turkey inside, still in the wrapper, waiting for Thanksgiving day, which never came. The sheetrock was damaged all over the house and ceilings, meaning that hardly anything could be saved. Dirt and disarray were everywhere, and there was nothing that could be of use or salvageable – believe me, we tried; we had a limited budget to make the house livable. We could only save four things, and that was after serious consideration – the original steps to the upstairs and the wall and handrail attached to them. The fourth item was the closet walls in what is now the living room. However, there was potential, and we could see it. The before pictures will speak for themselves. I warn you – these pictures are not pretty, some of it will gross you out, and it is not for the faint of heart.

The Before.

The old fridge with the rotten turkey surprise inside.

This is just a small sample of all the garbage we took out. I stopped counting once we hit 34 bags.
Extensive damage could be found all throughout the place.
The kitchen floor had suffered water damage, and everything was in rusty bad shape.
This picture says it all, and it also gives you an idea of the array of materials on the walls – various layers of wallpaper, panel, sheetrock, wood …

This gives you a clear idea of the condition of the place, and the challenge ahead. I will not lie, at one point I asked myself if this was a mistake; however, I always saw potential. This is an introduction to a series of posts on the work on the inside. Having a very small budget to work with, we had to get creative as far as materials and sources for those. We used recycled materials, repurposed many things, and found materials online as well from independent sellers. We also bought contractor left overs, and that saved a ton of money. Craigslist is an excellent source for finding contractor’s surplus. Brand new material at huge discounts. We also bought new materials from the big Home Centers when needed.

There was one area that we left as it was on purpose. We wanted to have a reminder of where we started and where we had been. It reminds us of many things, and also lets us appreciate the final product. I decided to frame it. It is located at the wall by the steps leading upstairs, the one we kept. Here is a picture of it.

A reminder, an inspiration.

It would be wrong to call this a restoration, as nothing has been historically restored, if anything, the soul to this house has been restored. It is our attempt to give life to a place we could call home. I will continue to share more on this endeavor, room by room. I hope you enjoy this post.

Fixing an Old Farmhouse – The Porch and Side Entrance

Following my last garden blog post, and since our future garden projects will require more time, energy, and budgeting, I will share what we have done so far on the outside part of the farmhouse, and will share the indoor work in future posts as well.

This was a 1910 abandoned farmhouse, and all I know about it is what the neighbors and people who have lived here at some point, or have played around when they were kids have told us. No one seems to have old pictures of it, and for what I understood, the house was part of a large farm that was eventually subdivided and sold in plots of land. It seems that it had two owners, the original owners, farmers, and the last owner who bought the remainder of the farm. After the second owner died, it became a rental, and later on sat abandoned for some time. I found interesting that many of the people who came to see it asked, “Where’s the barn?” or “What happened to the barn?” I never saw a barn in the property, but they insist that there was a large old barn to the left of the house, and behind. The barn remains a mystery. The feeling I got throughout many conversations with people who knew the place well is that all of them seem to have loved the house, and it was a main stop, a landmark for them. Last year, one person referred to it as “that was my house,” lamenting that he thought of buying it at one point, but did not. Another woman stopped unannounced one Saturday morning, and told me that she needed to stop by to see “the house” before returning to Maryland. She had been around for a week, and was ready to return home that same day. She told me that she wanted to buy it but everyone had told her that it was in severe disrepair and would be too expensive to fix. She regretted her decision, as she told me. I told her it was true. The house was in very poor shape, inside and out, a true nightmare from years of neglect by uncaring renters and many years of abandonment. For us the expense would be much less, because we did much of the work ourselves, and only contracted out what we could not do or what needed expert attention. One of those items was the window repair, and so far the most expensive item. The windows were broken and boarded up. We could not replace the windows ourselves because each window had to be custom made. Each window has different dimensions and standard windows could not be used. The upstairs windows are large and they go from floor to ceiling. The ceilings are low. It is one of the features I like most. Ideally, I would have loved to replace the broken windows with wooden ones, but due to budget concerns we had to go with custom made energy efficient vinyl windows, although we selected good quality.

It became obvious that this house had been loved by many, and still is, and that the previous owner was a very kind and welcoming woman who loved her garden. I think that is wonderful. To this day, one big ticket item remains on the list, and that is a new metal roof. The old one was in less bad shape that it looked, so we were able to coat it, and replace missing screws. It has been working fine, although it is not visually attractive, and since it is the original tin roof and over 110 years old, it must be replaced. When it is replaced, it will be done with a metal roof, which weighs three or four times less than a shingle roof/asphalt roof or other type of roof. Being it an old building with an original stone foundation, we don’t want to add the extra weight to it.

As far as siding, we decided to keep the original aluminum/metal siding because it was in good shape. I have had experience with installing new vinyl siding on my previous home, and it did not hold its appearance/shape too well. Therefore, vinyl is not my favorite choice, and other materials are costly. The actual aluminum siding will have to be repainted throughout the years, but that is fine. Underneath, there is wood, and on top, the aluminum siding. Its white color had faded, and it was very dirty, with many areas covered in vines. We cleaned it up, removed the vines and shrubs, and gave it a coat of fresh white paint; it showed like new. We concluded that there was no need to replace it. Here is the old farmhouse with the rusted roof and old/broken windows and doors.

Here is the house after a good cleaning, repainted siding and coated roof, as well as new windows, and other outside repairs.


The side door was one area that required much attention. The lack of an overhang structure resulted in water/moisture damage. The door was rotted, as well as the wood surrounding it, and the floor boards. We had to remove and replace all of it. In addition, the concrete steps needed to be fixed and painted.  We poured new concrete and painted it. Here are a few before and after pictures.

Before, during the process.


After. All the rotted wood was replaced. We built an overhang to protect the door from the rain and also installed a screen/glass door for extra protection.

IMG_5050

Photo by M.A.D.


Another area that was in very bad shape was the porch. The concrete floor was broken, and so were the door, windows, porch columns, and ceiling. We poured new concrete and painted it, cleaned the siding of vines and glass debris, installed new windows (contracted), and installed a new door and screen door. We replaced the wood on the porch columns, and some rotted wood on the ceiling as well. The broken wooden wheelchair railing/ramp was removed, and the steps were fixed and painted. Everything was given a fresh coat of paint. Eventually, the concrete floor will be covered with brick or slate tile for extra protection and durability.

Before and during the process pictures.


After, the porch as it is today.


This concludes the outdoor of the farmhouse so far. There are a few outdoor projects that will be done in the future, and those include garden projects, new roof, and the removal of large trees. The large trees job will have to be contracted. All the outdoor work has been done my husband and me, except for the windows, which required special attention. It has required a lot of devotion, hard work, dedication, and patience, but it has also been fun and rewarding. I hope you enjoy this post, and that it will inspire you to see the potential beyond what is deemed useless or beyond repair. I hope that it inspires you to take on some do it yourself projects, as well.

Recycled Garden Projects

On this post, I will share two very easy garden or backyard projects. These were made using recycled materials. We love hummingbirds and we decided to have a better place for them to come into the garden. My husband built this hummingbird post, and I painted/decorated it. We placed it in the faerie garden where it is mostly shaded during the day. Sometimes, the sun can make the sugared water too warm. We used leftover wood, the leftover paint we had from the previous light posts project, and other materials we had available. I thought it would take some time for the hummingbirds to find the spot, but they did right away.

IMG_5081

Photo by M.A.D.

The next project is something that sprung out of necessity when we first moved to the house, and we have been adding to it as the need arises. We needed an area where we could work while standing, and also where I could clean the rugs and let them dry. Eventually, it became an all purpose area. It has a worksurface/table, a rod to hang items, a hook to hang the hose, and this year we added motion solar lights, which help illuminate the area located at the back of the house. We used recycled wood from pallets and leftover wood. Recently, we gave it a fresh coat of paint. We are surprised at how much we use this area. It will probably evolve as the need arises.

IMG_5080

Photo by M.A.D.

I hope you enjoyed this post, and that it inspires you to create something around your place.


Garden Offerings

Now that I have shared how the garden has come along, it occurred to me to write about its blessings. Although, I took on a small garden project as a kid, for a short time (kid’s curiosity), and later on in life rekindled that love when I planted my first small flower garden when I lived in Jersey, it is now that I feel I have the time and place to be more creative and enjoy a garden.

Although we have had a very hot and humid summer here in Virginia, I am pleased with how the veggie garden has produced so far. The flower garden did very well during the spring, and by now, it is declining, although there are a few flowers due to bloom now. Despite watering almost everyday, the heat has taken a toll on the plants. The sweet peas, which were doing so well, dried up during the last week. I was lucky enough to harvest some peas on three occasions. The peppers are still growing and thriving; no signs of a pepper yet. I have to say that when planting from seeds, it takes a long time to harvest something, especially peppers. Next year, I might try a small portable greenhouse to start seeds earlier. I tried to do that indoors, but one of my cats had a party with the tiny plants. Tomatoes are doing well, however, compared to last year, I am dealing with tomato rot (I think that is what it is called). It is when tomatoes turn dark underneath, just before they are ready to be picked. I have had to discard some. I read that it is not recommended to eat them because the tomato skin has broken and it might contain bacteria. I don’t think that the seeds will do well for next year. I will start fresh. Cucumbers are doing very well this year, with a couple of them turning yellow before they grow more. Last year, cucumbers didn’t do as well. Lettuce is doing great this year, and I have collected so much, that I gave some away to my neighbor. All four varieties are doing great. Soon, I will be sharing tomatoes and cucumbers because it seems that those are going to produce much this year. The grape tomatoes are doing well too. Compared to last year, carrots are slow. I planted the rainbow baby carrots and also the regular ones. One plant I introduced this year is potato. I picked a few, a plant nearby the carrots. I read that potatoes and carrots should not be planted nearby (who knew?). Bugs are absent this year; last year caterpillars where an issue, and ate most of the lettuce. I was using several organic pesticides, and they did not perform well. This year I have not seen many bugs, and I used Sevin only once, so maybe that has to do with it.

Keeping a garden journal has helped me keep track of things/issues I would have forgotten already. I also use it to plan future areas in the garden. When I started gardening, I was not sure if I wanted to keep one but I tried it anyway.  I have found it very useful, especially when correcting mistakes from the previous year. This year’s entry might read – Please, do not plant potatoes next to carrots; no, don’t do it!

If the hot weather continues, I am not sure how well the harvest will go this year. Here are some pictures of some veggies I have collected so far. Hopefully, there will be more,  despite the heat. Also, pictures of the flower garden offerings.

I noticed that fresh vegetables do not last as long in the refrigerator as supermarket ones; they become soft sooner, especially lettuce. I was keeping lettuce in a glass bowl in the crisper section of the fridge, but decided to keep the plastic trays that are used for fruit when you buy it at the supermarket, and what a difference does it make. It seems that these plastic trays help keep the veggies crisp longer. Save those, and use them if you can; it works better than glass.

IMG_5082

Photo by M.A.D.

I pick the tomatoes as soon as they start getting soft to the touch. They continue the process inside. Stink bugs like tomatoes.

IMG_5113

Photo by M.A.D.

A mix of veggies as they look before cleaning them.

IMG_5115

Photo by M.A.D.

Various types of lettuce. Journal entry from last year – Caterpillars hate fancy lettuce. They prefer the regular variety.

20200606_182723

Photo by M.A.D.

A few blessings from the flower garden. The perfect hand of God.

IMG_5037

Photo by M.A.D.

These are mini sunflowers. They grow maybe about two or three feet tall, and bloom lovely.

IMG_5072

Photo by M.A.D.

Nature’s lace.

IMG_5073

Photo by M.A.D.

Tons of color.


The tiny rose bush that could.

20200421_145914-1

Photo by M.A.D.

Two different color irises.


The unexpected. Plants found around the property while clearing out weeds and bushes. We transplanted them.


The magical. Mushrooms galore and a little bit of luck.


The most beautiful blue.


The new and sublime.


The lost and found.


The forgotten. As it was then.

l03d70842-m1xd-w480_h360_q80

Photo by M.A.D.

I hope you enjoy this post.

The Long Lost Garden

I love flowers and all kinds of plants. Maybe because I have strong memories of my grandmother’s garden when I was a kid. The garden was not large, but it seemed huge to a 4 year old. I felt at ease in it, lost in time in it. Eventually, the garden was eliminated and concrete took its place. The magic was gone.

My favorite style of garden is the English garden. It is wild and free, and at the same time contained by itself. I always thought that an English garden had soul. I dislike manicured gardens that are too planned, symmetrical, and rigid. Where’s the life in that? When we purchased this old house, it had been abandoned for 3-4 years, neglected by previous renters, and the owners where out of state, the heirs to a woman who loved her garden. People who grew up in the neighborhood and knew her, tell me about her love for flowers and plants, and how she used to walk through her garden, admiring it. I am told she was a very tall woman, and neighbors were used to seeing her walk regal amongst her plants. Unfortunately, she fell on an icy day, and never quite recovered. Her beloved home became a rental, and no one took care of her garden the way she did. Eventually, the house fell in disrepair and ended up a dilapidated farmhouse waiting to be demolished, either by time or by people. That is, until we found it and resurrected its soul. This post is about its garden, and about uncovering and working with existing areas in an effort to use the not so obvious/the hard to see potential, and saving money in the process.

The house and premises were covered in overgrown vegetation, and the preexisting garden, if any at that point, was gone. There were a few plantings in bad shape. Unable to move right away, we took short trips to start clearing up the overgrown vegetation, and once under control, hired someone to cut the grass regularly so it wouldn’t grow too wild again. The house sat for another five years until we moved, for a total of eight years. As we cleared the morass of bushes and trees, we got an idea of what could be salvaged and what had to be removed. It was a long process that continues until today, mostly because we are doing it ourselves. Three very large trees remain, two dead trees and one very large near the house. It is diseased and requires professional handling as well as the other two. That will be next on the agenda.

Few plants remained of the original garden. An overgrown hydrangea in bad shape, a tiny rose bush buried in weeds, two dwarf boxwoods that we thought were gone for good but made it. A Rose of Sharon bush that we were able to save, a large bush of ornamental grass, and existing pine trees. We were able to free a forsythia that was growing wild under the siding and spread out high over the porch. Remnants of irises and other small plants were found thriving under bushes and all kinds of weeds. We transplanted those to other areas, hoping for the best. They took to their new area beautifully, almost as if grateful for being freed. Little by little we found bits and pieces of what once was a woman’s beloved garden.

When I think about it, it was a lot of work, hard work. Our neighbors cannot believe the transformation. One neighbor told us that he thought the house was eventually going to be torn down or fall on its foundation. Many people have come to see the house, a house they lived in at one point, played in, or visited. They all approve of the respectful changes, and they all agree that the woman who loved her garden so much would approve of it as well. I am glad they feel that way. It means that we are accomplishing what we set out to do. On this post, I will share some before and after pictures.

Entrance to the house then, and entrance today.


One of our latest projects was to add marble chips around the house to prevent weeds from growing. This area was covered in weeds and bushes. All the plantings were existing or transplanted from another area when found. The rose bush has grown healthy and has required a trellis.

IMG_5050

Photo by M.A.D.

IMG_5049

Photo by M.A.D.

Here you can see the forsythia that we cut to shape and trimmed. It seems happy now. All the potted plants have been added or transplanted.

These are the same areas before. On first arrival and after clearing some of the vegetation.


The foundation to the house is an original rock foundation, which has been supported with cinder blocks over time. We cleared out the weeds, painted, fixed the crawl space doors, and placed marble chips and potted plants around it. We also added solar lights, and rocks that we collected around the property.

This is a before picture, when we cleared out some of the weeds and grass.

Digital Camera

Photo by M.A.D.


This is the same area now. Here you can see the trimmed Hydrangea bush and existing irises. The pine tree in this picture was found as a tiny (2 inches) planting that I thought looked interesting enough, and I potted it. It turned out to be this beautiful pine (cedar) tree. Eventually, we will cover the exposed cinder blocks with cement and repaint the area. On this picture you can see the original stone foundation. One thing we made sure to do before buying the place was to hire an inspector to make sure the foundation and structure were in good shape. Those were fine.

IMG_4996

Photo by M.A.D.

The marble chips were placed all around the house. Here you can see two existing bushes that we were able to save, after trimming them, and also one of the dwarf boxwood trees behind the bird bath. This boxwood was almost dead and it has come back slowly. The lily is also an existing plant. We added all the large stones found around the property. The Hostas and Hen and chicks plants are new, and added to the area. These were brought from my garden in Jersey. All the statues are recycled from my previous home in Jersey, and so is the bird bath.

IMG_5046

Photo by M.A.D.

IMG_5047

Photo by M.A.D.


Here you can see the other dwarf boxwood and other recycled plants.

IMG_5045

Photo by M.A.D.


Here are some pictures of the same areas before. The dwarf boxwood looks brown and dying.

l03d70842-m0xd-w480_h360_q80

Photo by M.A.D.


A before view of the same steps where you can see the boxwood better.

Restoring an Old Farmhouse on a Budget 2

Photo by M.A.D.


This is the side entrance area. There were no plantings, only weeds. This area was challenging to work with.

Digital Camera

Photo by M.A.D.


Same area as it is today. New plantings have been added to the area, as well as recycled. All pots in the garden are recycled.

IMG_5052

Photo by M.A.D.


We worked with some existing areas by keeping some of the plantings, and adding stones and new or transplanted plants. Here is one of those areas before.

Digital Camera

Photo by M.A.D.


Same area as it is today. The only existing planting was the bush in the center, The rest was transplanted from other areas of the property. This area blooms throughout the year. In early spring the irises bloom first, followed by the lambs ear, and later in the summer other plantings bloom. A solar light and a couple of statues and rocks dogged around the property were added.

IMG_4835

Photo by M.A.D.


This area is directly under the giant cedar tree. It is one of the oldest trees around the house, and possibly older than the house, as I am told. We cleared/cleaned the area and added existing plantings around the tree. Red mulch was added as well.

20200329_160734

Photo by M.A.D.


The giant cedar before. Today, it looks healthier.

Digital Camera

Photo by M.A.D.


Other existing areas that we were able to save. Before, after clearing the area a bit and cutting the grass.

Same area as it is today.


I have mentioned the faerie garden on a separate blog post, and it is one area in which we added much to it while working with existing elements. The area before and after.


There are a few new areas, and that includes the veggie garden which was not there, and what I call the circle of flowers. Pictures of this area before. Today, the circle of flowers is where the overgrown bushes are, and the veggie garden a few feet right behind.

Digital Camera

Photo by M.A.D.


The veggie garden


I created the circle of flowers because I wanted an area full of color, where I could pick some flowers to bring inside. It started with clearing out a circle where old stumps remained, and placing some stones we collected around the property. We planted some seeds, and many of them continue to grow and bloom today. Next to it, we created another circle (still needs the stones around) where we planted sunflowers. They have not bloom yet, but soon they will. As of today, they are a lot taller.


This concludes the outdoor changes so far,  although there are many other plans. We created areas around the home, and separate, individual new areas. Instead of tearing everything down, we worked with existing areas that had potential, by first uncovering them, salvaging some plants, and adding to these areas.

Little me in my grandmother’s garden. Hope you enjoyed this post.

me2

Photo by M.A.D.

The Lighted Pathway

Since the pandemic hit worldwide, my mind has not been in the right place to write my current novel. It shall pass. Instead, I have been helping my other half with projects around the home, much of them waiting for the right time. We have finished many projects, and more are due. I have been sharing some of these projects on the blog. We continue to fix this old farmhouse, trying to conjure the vision we had for it. Sometimes, it feels as if the old house is not agreeing with our plans, so we listen, and find common ground. This post will be about alternative ways for outdoor lighting and security light options, while keeping a budget in mind (as we always do).

When we moved here we discovered how dark it can be at night time. Our closest neighbors have security lights through the electric company but we did not want the extra expense on our electric bill. Electricity in this area is more expensive than in Jersey, where we came from, believe it or not. We decided to go with solar lighting, which was affordable, lasting, and came in a variety of designs and prices. We decided to use solar lights around the house, at particular spots, and also along perimeters and driveway. We were not sure how it was going to work, so we started slowly, testing areas, adding lighting, until we reached a point were we were almost satisfied. My husband and I love lights, we are crazy about them, and that is why I say almost satisfied, because I know it will evolve at some point. We have found that solar lighting is very reliable as well as cost efficient, and fits our budget perfectly. Not only does it serve the purpose of illuminating the necessary areas, it also looks beautiful and brings a cozy feeling to the surroundings. If you are not sure about solar lighting, start small, test a few ideas, and keep adding to different areas over time. For us, it works fine. Here are a few pictures of some areas to give you an idea. They range from less to more needed illumination. The pictures were taken at twilight to best tell the placement/area.

The side entrance is usually more dark than the front entrance, so we placed some small solar lights around, and a few spot lights nearby. We also added a solar light on the wall next to the entrance that illuminated the entire area (not shown on this picture).

IMG_4670

Photo by M.A.D.

20190407_200453

Photo by M.A.D.

A before picture of the same area. Nightmarish and challenging. A total run down disaster waiting for us.

62023

Photo by M.A.D.

A view of the front side solar lights.

20190407_200408

Photo by M.A.D.

View of the same area before – spooky charm.

l03d70842-m0xd-w480_h360_q80

Photo by M.A.D.

We decided to place motion lights at the four corners of the veggie garden. Many times, I have seen deer late at night. One night, I saw two large figures near the garden – two bucks fighting, each standing on their back legs.

IMG_4675

Photo by M.A.D.

We had placed motion lights on poles near the faerie garden and parking area, and these proved to work great, so we decided to listen to the house and carry the theme by the entrance and driveway. The poles were painted barn red. The 6×6 poles near the fairy garden are from recycled wood. These are cut at 4 feet each, and down into the ground 1 foot. They are treated wood. For the rest of the poles, we decided to go with 4×6 treated wood. Each 12 feet pole was cut to render 3 four feet poles. We only had to buy two. These were placed in the ground at the same depth. Each pole has a solar light attached. They are always lighted but increase intensity when motion is detected, so if we are walking down the driveway at night, there is plenty of light. In this case, the house spoke. Our original plan was to do old fashioned lantern poles down the driveway, but these fit the character of the house better, as well as our pockets.

Faerie garden poles (6×6)

For the driveway, we decided to go with 6×4 treated wood. The 6-inch side facing front.

IMG_4995

Photo by M.A.D.

IMG_4994

Photo by M.A.D.

View at night with no motion.


20200611_211235

Photo by M.A.D.

View with motion. My husband testing the sensors.

20200611_211257

Photo by M.A.D.

My husband made this for me when we first bought the house. A lighted replica of our vision. Later we decided on blue instead of red for the porch. He has to make a blue star for the replica to match the one we placed on the house, and the real house still needs a new roof, which will be blue metal.

20190220_181144-1

Photo by M.A.D.

IMG_4685

Photo by M.A.D.

I hope this post was inspirational, and gave you ideas for lighting options, or inspire you to create something for your place.


The Recycled Veggie Garden

As soon as I spotted this old farmhouse, I had a vision for it. It took my other half a bit more time to see it, but from the beginning he saw the potential it had. Immediately, (as it usually is for me) tons of future images began circling my head, and those would evolve into plans. One of those plans was to have a vegetable garden. For that to happen, we had to clear out a lot of years of grown vegetation, trees, bushes, and later on decide what type of garden we wanted. That took some time and a ton of hard work, but between my husband and I, we managed to get to a point were we could plant and grow something. This garden has not disappoint me. We decided not to plant on the ground because it was easier to control growing in raise beds, and I had an issue with the many (I mean many) critters that walk/crawl around. Also we have many deer coming through so we decided to create a fenced garden. The goal was to spend as little as we could, and most materials used (except for mulch, a few solar lights, soil, and paint), are recycled/repurposed/reused. That being pots, wood, garden accessories, and décor. As of this writing, I have already harvested lettuce twice, and a few peas, the rest is still growing, but soon it will produce. This year we planted two varieties of tomatoes, peppers, three varieties of lettuce, cucumbers, carrots, potatoes, and peas. This will provide plenty for us, and to give away as well. We set up a spot in the back of the house to plant squash and pumpkins, but I am not sure how that will grow. It is not fenced and deer prance around. Eventually we will add another raise bed to this garden, as there is enough space for another one and more pots, and I think for a small portable green house as well, one that could fit into a corner. We placed a recycled shelf to use as a potting station and storage underneath. It works fine. The construction was made using recycled wood and pallets. Here are a few before and after pictures.

This is the area as it was, abandoned for many years, overgrown with all kinds of trees and bushes intertwined.

Digital Camera

Photo by M.A.D.

This is during clean up. The larger trees and bushes remained at that point. Before removing a tree or bush, we thought hard about it. If it was salvageable we left it, but most of them were inside a morass of weeds and three or four varieties growing together at once. So it was difficult to separate them. We were able to save a few.

Digital Camera

Photo by M.A.D.

This is today. View of the area where the vegetable garden is.

IMG_4641

Photo by M.A.D.

IMG_4944

Photo by M.A.D.

IMG_4945

Photo by M.A.D.

Deer wishing for a veggie bite. She is next to a tree that we were able to save.

IMG_4909

Photo by M.A.D.

At night, I enjoy seeing the garden come alive as well. I placed solar lights in a few areas.

IMG_4951 (2)

Photo by M.A.D.

I painted this in 2012. It is the farmhouse as I saw it, abandoned, but I saw beauty in it.

IMG_4824

Photo by M.A.D.

This garden will continue to evolve with us, according to what is needed. It is in the beginning stages, but it has room to place more containers where we will grow other varieties of vegetables. There is enough space to add to it if we need to. I hope I have inspired you to create a simple garden if you have been thinking of building one. It does take work, but not a lot of money if you recycle materials. You don’t need a lot of space, and if you live in an urban area, a small area in your porch/apartment can accommodate pots or hanging baskets. You can plant something anywhere. It has been a fun and interesting project so far. For me, it is a place to grow food but also a place where I can find relaxation, a peaceful retreat, hence all the bunnies … I hope you enjoyed this post.


No More Skeletons in the Faerie Garden

Continuing with the old farmhouse posts, I will do another before and after of the garden area. It had been a lot of hard work to start getting this old place into shape, and this year, it is starting to look a bit better. It has been almost five years since we moved here. For those of you who are wondering what happened to the older posts, I had an out of body experience and one day woke up wanting to make this blog only about writing. Without a second thought, I deleted all those posts and the memories with them. Later, the alien inside my brain crawled out and I realized that this approach was not working for me, and I missed the old ways. I am more a glimpse on all sides person, so I decided to bring back those glimpses on this blog. I don’t think I can get back the deleted posts, so I am moving forward with some before and after posts. Hope you enjoy these.

The faerie garden was an area that was covered in bushes and weeds. It had a large carcass of a dog or coyote (I could not tell the difference) resting on a small piece of concrete. After clearing out the brush in the area, we discovered that the small concrete area was under grass that had taken over and continue to grow atop, alongside some moss. We scraped the area and uncovered a generous size concrete circle where we decided to place some patio furniture, a grill, and create a small faerie garden, which has always been a little dream of mine. The area has a large amount of kelly green moss growing and expanding, and I have always been a fan of moss, so it happily worked out. Every year, I add something to the area, whether plantings or any decorative feature. We tried to work with was already there, and it works for us. Here are some pictures of the faerie garden area before.

023

Photo by M.A.D.

This is the area as it looked before, although we had cleared out a bit at that point, the skeleton gone. There was an electricity pole that one day just disappeared. It was puzzling; how does a gigantic pole disappears? When we inquired, it happened that when the previous owner closed her account after selling the property, the electric company came and took the pole out of the ground. I found it hilarious. Here are two different views, one of them uncovering the concrete circle.

Digital Camera

Photo by M.A.D.

Digital Camera

Photo by M.A.D.

Here are a few pictures of the area as it is today. I am sure that we will add to it over the years, more on the form of plantings, garden lights and stones. The flowers in that area will bloom around late spring/June. It is mostly a shaded area so I am happy that something blooms.

IMG_4701

Photo by M.A.D.

IMG_4636

Photo by M.A.D.

A closer look of the critters and mossy area.

IMG_4660

Photo by M.A.D.

Viewed from another angle. Al the stones, wood, and cinder blocks were found on the property, either around or in the woods behind. We dogged out many stones. The goal was to utilize what was already there, and find a way to create areas with purpose. When we start a project, we set a very low budget, and we consider existing/found/recycled/reused/restored/vintage first before spending on new. This approach has worked out for us.

20190714_184243

Photo by M.A.D.

67349-1

We added solar lighting to the area by  utilizing recycled wood, and painting it. All the outdoor lighting is solar. The area continues to emerge over the years.

I hope you enjoyed this post of the faerie garden. I will post more before and after pictures of other outdoor areas/projects in the future, as well of the farmhouse work.


Of Mind and Heart

During this time, like many of you, I’ve had the opportunity to reflect and do many other things at home, alongside my husband, who is at home as well. For some reason, my mind has been scattered a bit, and my attention far away, not conducive to writing my next novel. It is a mixture of being sad, foggy, and in a cloud, that is how I can describe it best. It is hard not to pay attention to the news, and what I hear does not help my mind and heart. I have read some posts, and many of you are dealing with similar feelings, and trying to cope with your situations.

Writing my novel has not been easy, and I have been writing sporadically, but mostly, have put it aside, only to visit it again when it crosses my mind, almost calling me. For now, I have joined my husband in many projects around the home, some of which have been put aside for lack of time before. We have been working on clearing out bushes, trees, chopping branches, burning brush, taking out stumps, making pathways, and tackling the hard chores around this place. We still have a lot of work to do outside, and this time has been good for that. It has help both of us, I think, to feel a bit more centered, and productive as well. We have painted, planted seeds, made new gardening beds, made new garden areas, and also enjoyed the good weather days. Outside chores have been therapeutic.

My husband is not used to being at home, so he has dived in a plethora of projects to keep himself busy. Although these are sad times, we are trying to make the best of it, in our own way, as many of you are doing as well. I took my camera and took pictures around, of some work done, of little discoveries, of trees and old bottles … . For those of you who miss the old farmhouse posts. Nancy, this one is for you.

IMG_4642

Photo by M.A.D.

We started clearing out brush to make walking trails around. That is a big project in itself, but it got started. Eventually we will frame an entrance that will have this message – Keep on the path of the Lord.

IMG_4638

Photo by M.A.D.

Started a circle garden and planted all kinds of colorful flowers seeds. Some of them are already showing up. We are going to have a couple of frost mornings so I will have to cover all seeds on Friday. Hope they make it. I have yet to make another circle garden next to this one, It will be planted with sunflowers.

IMG_4636

Photo by M.A.D.

A fairy garden has been completed, although I am sure that I will add more faeries to it, and other critters. It is an area with moss and where all kinds of critters are welcomed. I placed water dishes for frogs, bunnies … When we bought the place, this part was covered in weeds and bushes, and there was a carcass of a dog or coyote in it. We uncovered a beautiful mossy area, and a circle of concrete that was probably the area where patio furniture was placed at some point. We made it into a grill/patio area, and the perfect spot for a fairy garden.

IMG_4641

Photo by M.A.D.

The last box for the veggie garden was built and painted. All seeds have been planted for this year. This area was also covered in bushes and overgrown weeds/grass. Little by little we have been getting rid of the untangled mess, and clearing out the place. The large pine tree in the background was covered as well, and now it is free and happy. It is as old/older than this place, over 110 years.

IMG_4593

Photo by M.A.D.

This used to be a tiny rose bush that was being choked to death by overgrown weeds. We uncovered it, and it has grown into a beautiful rosebush. We had to build a trellis for it.

IMG_4546

Photo by M.A.D.

The old well got a coat of paint and top. It used to be covered by bushes and grass, you could not see it. The entire place was hiding under a morass of overgrown flora. We never got to paint it after fixing it. And so did the old shed door. It was rusty, with a door hanging to one side. Amazingly, the inside has been preserved; it is the old log and mortar construction that eventually was covered with aluminum siding. As old as the home is.

IMG_4557

Photo by M.A.D.

IMG_4413

Photo by M.A.D.

We rescued this holly tree. We found it growing in the back, under a mess. We cleaned around it, and hopefully it will do a bit better now. We might have to cut those two trees next to it.

IMG_4418

Photo by M.A.D.

Trees around here seem to grow in two’s and three’s.

IMG_4563

Photo by M.A.D.

This area was the driveway, and it was also covered in bushes and weeds. The grass was so tall that it hit my knees. A couple of weeks ago, we managed to clear out the last two stumps. These were chopped and burned, along with many other branches.

IMG_4639

Photo by M.A.D.

20190427_114802

Photo by M.A.D.

20190605_095610

Photo by M.A.D.

20190611_080152

Photo by M.A.D.

Slowly, many garden areas are emerging. I have found single plantings of what might have been a long lost garden, and I have replanted some of them. This hydrangea was the inspiration for the blue paint we used on the place. There was no garden. I have more plans for other areas, little by little. There is a perfect spot for a rain garden.

20190424_081955

Photo by M.A.D.

I took this picture last year. The garden was starting to come alive. This year it has come back stronger. This area will have stone where the wood panel is for now.

Here are a few before pictures of the area. I had forgotten the nightmare. On another post, I will share some more. I don’t want this post to run too long.

Digital Camera

Photo by M.A.D.

The old shed as it was before, at the point of being cleared of weeds. We had to make a pathway to get to it.

Digital Camera

Photo by M.A.D.

Here is the driveway as it used to be. You could not even see the road.

043

Photo by M.A.D.

The old well in the process of being cleaned up. All around the place the grass was brown; now it is green and even feels like carpet under your feet.

Digital Camera

Photo by M.A.D.

Little by little we uncovered the place, house and everything else. In this picture you can see a bit of white if you follow the path my husband carved to the right. That was the shed before it was cleaned up.

Digital Camera

Photo by M.A.D.

The old farmhouse starts to emerge. There was even a concrete pathway. It has been tons of work but rewarding.

18433

Photo by M.A.D.

This picture was taken two years ago around Christmas time.

I hope this hasn’t been too boring or too long. It has been quite a journey, a labor of love by two people. We still have tons more work to do. The old roof was coated and painted, but we need to install a new one. The interior was finished. I will continue with the before and after of the place on a couple more blog posts. In the meantime, I hope you enjoy these pictures of the progress so far.