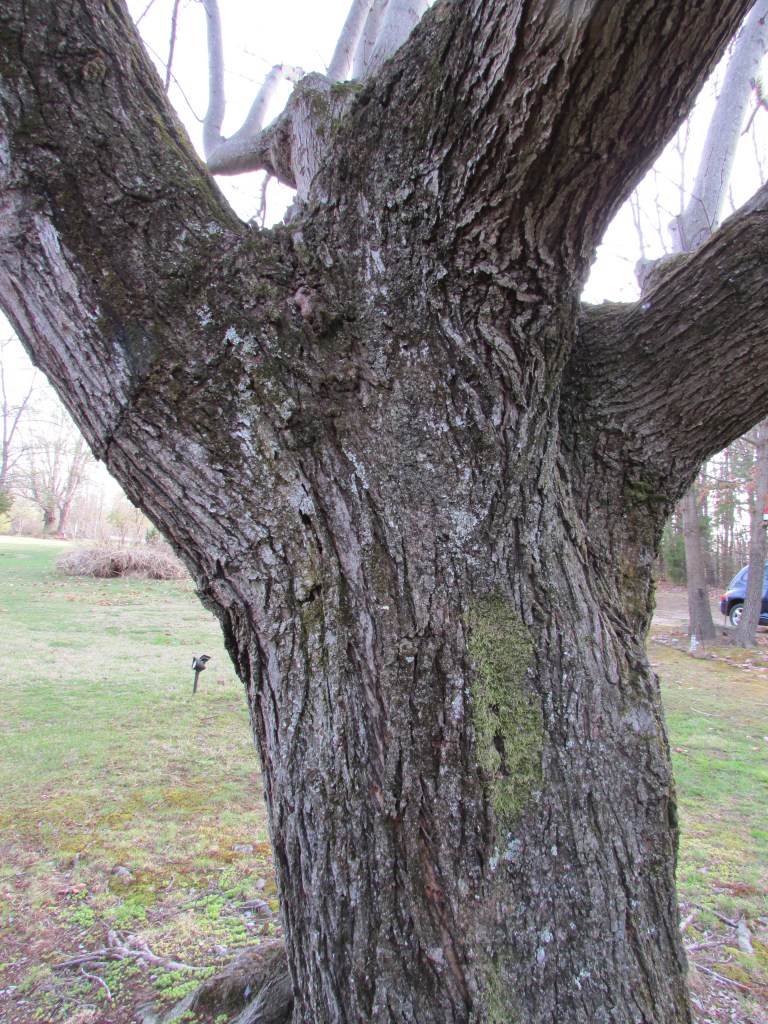
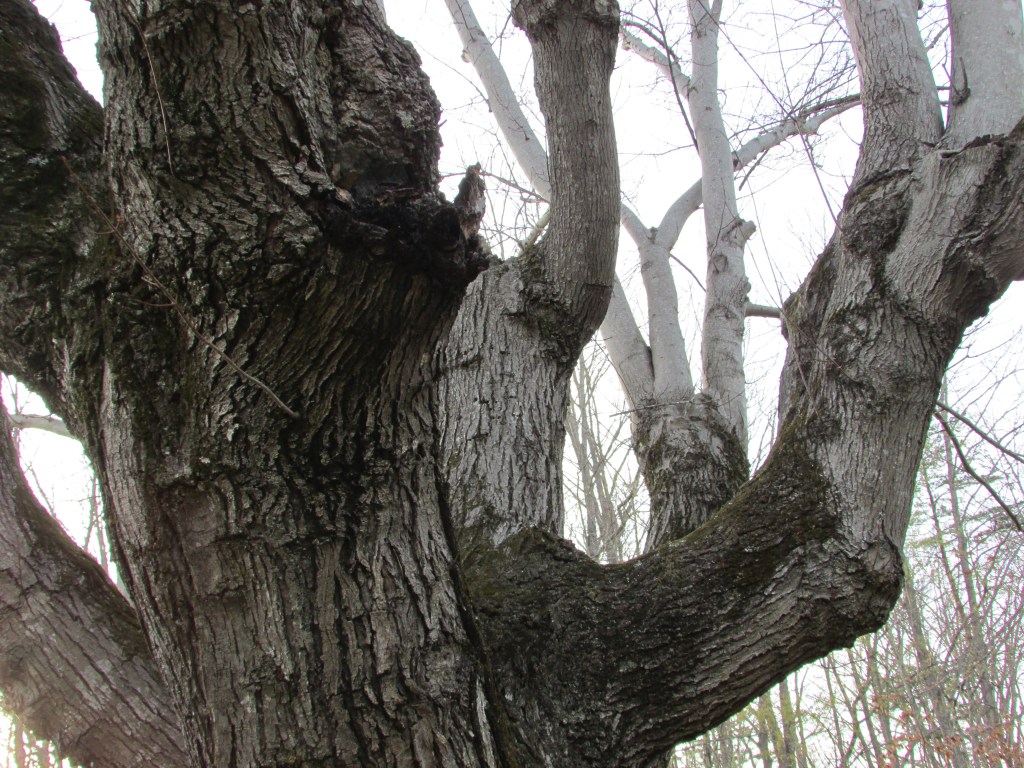
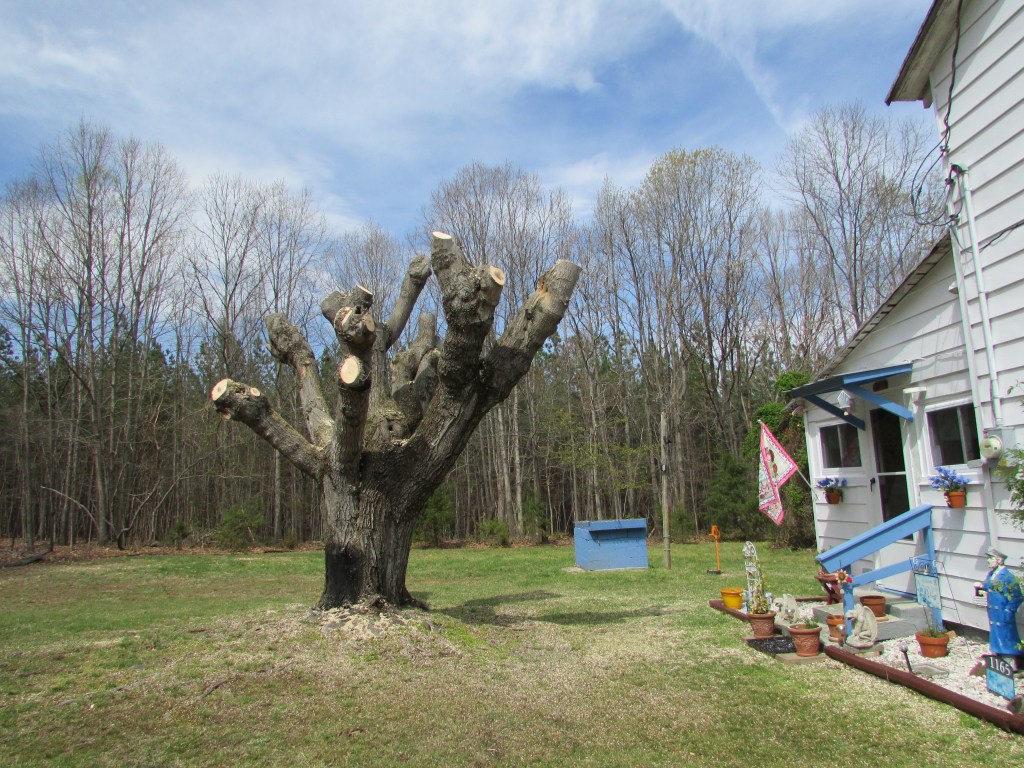
Sometimes, ideas come to mind unexpectedly, and that is how a project is born. I saw a few pieces of wood that my husband had destined for the garbage and I decided to do something with those pieces. I had all the necessary materials at hand, so why not? One thing that came to mind was the UPS/FedEx truck passing our house, and turning back, and sometimes, back and forth, trying to find the address. For some reason, the navigation system does not point to the exact location; always further away. The house is set far back, so it is easy to miss. So I decided to help them a bit by making a house number sign with the leftover wood. I wanted a bit of a yesteryear look. This is what I came up with.
Materials – leftover wood, nails, and paint. The horse is one of my husband’s rejects ( he makes wooden toys …), and I thought it was the perfect thing to add.
I decided to spruce up the veggie garden. I made a cross with the rest of the wood, and added a homemade banner made from vintage fabrics and antique clothespins.
In the meantime, my husband was reconsidering his previous trail sign, scrapping it, and making another sign.
He likes this style better, and so do I.
What happened to the other sign? I placed it on the veggie garden. Unfortunately, the plants are not growing as fast this year because of the heat and lack of rain, even when alternating watering. Even the lettuce is not producing as well as last year. The peas dried up and died.
The red box is in need of painting already; probably next year.
This onion plant is like a piece of art – a sculpture.
These projects gave me the time to reminisce, and enjoy the work.
BEFORE – Sometimes one has to look way beyond the scrapping wood.
AFTER – We have come a long way from when we started; small steps make a difference.
I hope you enjoy this farmhouse project. Next project will be the rebellious hydrant. Parts are on order; who knew that Universal fit is not really Universal?
Nature never disappoints. I was able to capture a few images of some visitors. It has been hot and dry around here, the garden is growing slowly, even lettuce is taking its time. I do what I can to provide these visitors with some comfort, a birdbath always filled, small plates of water for ground critters, and areas in the garden for them to enjoy shade. Here are a few of the visitors.
I am not sure what kind of bird it is, but the colors are beautiful, and it is a larger size, larger than a Robin. The first time I see this bird around.
Bunnies have not been around as much as other years, neither do turtles, or snakes. I am not sure why.
Crows, Ravens, are a plenty around here.
BEFORE -The wood around the garden was in need of painting. I had leftover paint, so it was a quick an easy job, under an hour. We have been painting what needs to be, keeping up with time.
AFTER – The wood is shiny and bright again, at least for a couple of years. $$$Tip – If you want to save on garden wood/logs look at discounted wood, usually found on pallets around the garden section in home improvement stores, or the rough cuts in mills. This is how we did the entire perimeter of the house. Once you paint or stain it, the wood will look great and will last long.
Next project will have to be one that just popped up – fixing the hydrant, which has been leaking, unbeknownst to us. It requires digging, so it will be a learn as you go project. Hope you enjoyed this post.
There is plenty to do around here; never a dull moment. We armed ourselves with motivation to tackle a short list, mostly things that have been waiting – installing a window a/c for when the heat becomes unbearably dangerous, weeding out the garden, trimming bushes, planting corn again (something plucked all my corn plants, one by one), caulk porch columns, and do some minor painting retouches. The caulking and the painting had to wait because of rain that never showed up during the day, but poured at night. We will tackle those later on. However, I was able to do a quick and easy project with left over materials – a bird/critter feeder, and my husband was able to work on something for his trail project.
The bird/critter feeder was something that I thought of buying but instead I decided to give it a try by using some recycled items – old metal cookie plate, leftover 2×4 wood, and foam planter bottom. It was quick and easy, and it works – zero cost. We gave the wood a coat of paint. The planter bottom serves to prevent weeds and to keep it clean around the base. My husband drilled small holes on the metal plate for draining the water when it rains. Eventually, I might plant some flowers at the base. Could not have been easier.
Homemade bird and critter feeder.
My husband decided to make a sign for the lighted trail entrance. This is a project that he started last year, will be time consuming and hard work, but he is obsessed with it, and will work on a small part of it when he gets a chance. My vision for it was two 4×4 poles with a wood beam across and a burnt wood sign in the middle, but he wanted to go the more natural and less expensive route, and use the trees already there; after all, it is his project, not mine.
This time he added a simple homemade sign. He plans on having two more entrances and an exit.
There is always time to admire favorite plants, and this garden has come a long way from the morass of abandoned overgrown vegetation it was.
Can you guess which Calla Lily is not real?
Love the color of this one. I leave the bulbs throughout the winter; they come back, and the plant comes back stronger and fuller. This is the third year.
Another lovely color.
My favorite shade of blue.
We will continue to add to this garden; it has been a labor of love. I hope you enjoyed this project.
We had plenty of rain over the past two days, so in the interim, we were able to tackle one of the projects from the immediate list – opening up an area in the back part of the property for pumpkins or other veggies . Last year, we tested a small patch of grass where we were able to grow a few pumpkins and cantaloupe, not many. We realized we had to move the planting a bit to the front, where there is a bit more sun, so we finally settled on the area. We took advantage of the very wet and soft ground after the rain, and we finished the job quickly. The seeds are planted. Only a few rows, just for a second test to see how it goes. This year we planted a few seeds – pumpkins, cantaloupe, sunflowers, and a bit of corn. Not too much because we are still testing. Here are a few pictures of the project.
Clearing up this section was easier than we thought because of all the previous rain.
While digging out grass, we found all of these interesting objects. Mostly, old electrical parts and tools, bolts … I wish I could have a window to the past and see the story attached to each one.
Of course, these will end up in my collection. Why? Just because.
And here they are; in their rightful place. It has become an obsession that doesn’t require an explanation.
After testing this area, if it works out it will be expanded a bit to be able to plant more, and added to over time. I am sure that we will find more interesting things buried in the soil. I hope you enjoyed this project; I surely did.
It started last week when we restored a couple of old garden statues on a rainy day, and we decided to continue with a task that has been put aside for a while. While my husband tackled the remaining garden statues to be painted, I decided to restore the old porch chairs that needed a little TLC. The weather has taken a toll on the finished wood, but the chairs were still sturdy and solid. We already had the paint and materials around, so all we needed was time and effort. It is easy to discard something when it starts looking weathered and old, but it is not necessary at all.
These were a gift from a good friend for our first house, which makes them over 20 years old or so. When we moved, these came with us.
After my husband cleaned and painted these, the garden statues look great again. I think these can withstand a few more years in the garden.
This tired old chair is in need of some love.
All it needed was a light sanding, dusting, and a coat of stain.
This chair needs some attention before heading to the dumpster. I ask myself the more than one life question – is there still life left on it? If the answer is yes or maybe, then it gets the attention it deserves.
These chairs cost over $500 if bought new. Because we already had at hand the materials we needed to restored them (leftover stain, sanding paper, rag) the cost is $0.00.
Before discarding something as not useful anymore, ask yourself the “more than one life” question. If the answer is yes or maybe, go for it, and give it that life, restore it to beauty and good use once more. In the end, your pocket is happier/fuller, and Earth will thank you.
It was a rainy day, nothing to be done outside. It was the perfect day to tackle a chore that had been put aside for some time – bringing back to life old garden sculptures. People tend to discard garden sculptures because paint has faded over time or the elements have taken a toll on these; however, with a little effort these can be brought back to life. We purchased a few garden sculptures over 15 years ago for our previous home, and when we moved we took them with us to the farmhouse. Although I love the weathered look of garden sculptures my husband likes a more clean and painted look, so he took on the task on a rainy day, and I joined in the effort. We sat on the porch, enjoyed the sound of the rain in the old tin roof, and painted away. A cup of hot chocolate made the task more enjoyable.
It doesn’t take much effort, other than dust them off and make sure the sculptures are not wet, or at least almost dry, but we had put the job aside for years, and because I like the weathered old look there was no rush; however I have to say that these really look good painted. After painting them, we sprayed a light layer of clear coat to protect the paint. The paint and clear coat will help the sculptures last longer, and also prevent the concrete from eroding faster. Here are a few pictures of the project.
Before – In the process of painting these two bunny sculptures.
After – The bunnies look beautiful now. The pots in the back are filled with two tiny evergreens I found around the property. On the opposite side, there are two more. They will grow to resemble Christmas trees.
This one has grown fast; it was barely three inches when planted.
I liked the old patina on this cement pot, but the birds were not noticeable anymore, so we decided to bring back the original color of these birds and leave the old patina just be.
We have a few more sculptures to restore to beauty. Old things are lovely, and can be made lovelier with a bit of effort.
I know that there are things on our To Do List that should have priority, but sometimes, we cannot help it and an idea just hits one of us and we both run with it. This little garden project was born in my head while sitting on the porch as my husband was talking about things he would like to do around the future rain garden. He liked the proposed change and we went with it. One of the front bushes was looking sad despite many attempts to make it become more full. It wasn’t working. It was one of the original bushes we uncovered and tried to make healthier. Here is a picture of it.
It is the bush on the far left.
After trimming it very low to the ground to force it to fill up a bit, it did not do that, so we decided this year to remove it and move one of the stone benches on the porch to that area. Here is the result. We like it better that way. We thought it would be a difficult task to remove it, but to our surprise, it was very loose and came out easily. Maybe this was the reason for it to look a bit unhealthy.
The small boxwood by the bird fountain is still recovering from the large branch that fell on top of it during the ice storm.
Once you start you just keep moving, so my husband decided that he wanted to try something – moving the porch hanging solar light to one of the entrances that he is cleaning up to continue a few short trails. I thought about moving the solar light somewhere else but was not sure where, so that worked out.
Here is my other half working on his idea.
The solar lights are hanging from the branch he attached between two young trees.
We had to wait until twilight to see the result. The mason jar lights twinkle so it was hard to take a picture. I can see them through the kitchen window as I do dishes. Eventually all three entrances will have solar lights.
From there it was natural to move to something else, so I decided to make a little habitat for garden critters at the Faerie garden. I repurposed an old table stand and used it as a small trellis for an ivy, and under it I placed one of the chimney halves I had found before. As the ivy grows and becomes fuller it will turn into a cozy retreat for critters.
The idea is for the ivy to cover the entire structure and for garden critters to use it as a home.
As the garden wakes up, we keep helping it look better every year. This section is looking better after tending it with hope, working with the existing area, and adding a few things.
More irises have grown. Once the irises die, pink flowers come up, and after those, white ones, followed by tiny yellow ones. There is something blooming always. Originally, this area was an old trunk under grass and overgrown bushes. It has come a long way.
All seeds have been planted on the veggie garden area, and they are coming up. The seeds for the flower circle are planted as well, and hopefully, we will be able to clear an area in the back for planting cantaloupe, corn, pumpkin, and sunflowers. That part requires a bit more work. As the garden grows and changes we also grow and change with it.
This project was not in our radar, but we spotted a lovely tree with gorgeous white flowers, which seemed to be thriving in the back area of the house. My husband decided to try and free it from the bushes, grass, and other small trees that were suffocating it. That was all it took for us to continue the effort along a small area, working on freeing other evergreens, mostly cedar that are growing close together. So we did. Some smaller trees that were growing next to one another had to be eliminated, but this freed up growing space for the ones we kept. It was a joint effort; while my husband cut the trees, I removed the debris and piled it up with the rest of the dead branches that need removing, and I cleared the area with a rake. The area looks much better now. We are planning on hanging solar lights on the two entrances. We also think that it would be nice to add a bench and some flower pots in the future. For now, we will continue to work on the remainder part of the area. Here are some pictures of this unscheduled project.
One of the little cedars we decided to save. The back area is full of overgrown vegetation.
Most of it looks like this, one tree on top of another.
The white-flower tree has been freed, and a few cedars as well.
Other cedars and another white-flower tree are asking for help, and we’ll freed them too.
After that, we have been preparing the garden for planting, and cleaning up winter’s vestige. As soon as the weather permits and the temperature remains a bit warmer, work on the veggie garden will begin. We are still having some nights in the low 30F.
The veggie garden got a refresh, and the pots/boxes were filled with extra soil. It is ready for planting.
I worked on setting up this area last year, and I am seeing the results now; unfortunately, this is one of the giant cedars that will have to be cut down, after the ice storm damage.
Spring Moth Worms are starting to show up.
The shed got a light layer of mulch as well. Because we use pine needles from the property in the winter, it cuts down on how much mulch we need to use when it needs it. The plants in the pots keep coming back every year, so this area is almost effortless now. Eventually, much of the area will become almost effortless.
While cleaning up the back area we found part of a chimney top that was split in two parts. I decided to place these in the faerie garden as shelter for critters, whether frogs or whatever decides to visit.
Despite our ongoing project list, we never know what new project will show up on the side. It is always fun and never boring. Our goal is to get to a point were most areas are set up and become almost effortless to maintain, that is, considering the mess we started with when we bought the place (see Restoring an Old Farmhouse series of posts). I hope that you enjoyed reading about this project.
My latest post was about The Christmas Tree Project which we did last Saturday. While we were waiting for the moment it lighted up we had many autumn chores to do, and it translated on time going so fast that we hardly noticed the long wait until sunset. Around here, autumn means tons of cleaning up before winter or the first snow, prepping certain areas, and getting ready for future chores during early spring, so I figured I would share some of those.
Cutting the grass and blowing out leaves usually takes my husband the whole day. Once he is done, he sees another thin layer of fresh leaves that has just fallen. It is the never ending autumn story, but they look gorgeous when the entire grass is covered and one sees the many colors of the leaves on the ground, like a multicolor carpet.
Blowing out leaves and cutting the grass for the last time before winter takes priority. This is the fifth time for leaf blowing.
While Eddie took care of the grass and leaves, I took care of cleaning up the veggie garden, and collecting pine needles. I do this after I pick the last of the veggies and before the first snow.
Leaves are picked up, broken things go in the garbage, pots are emptied, collected and stacked in one area, large containers are cleaned up by removing dead and dried up plants, stakes are collected and placed in one area, and the remainder thin layer of mulch gets a refresher by using the collected pine needles. It prevents the cover underneath from breaking off. Overall, it gets a good cleaning.
After everything is done it looks like this.
After the veggie garden is done, the remainder of the pine needles is used as mulch for some trees. It protects them in the winter, and also looks neat. We are lucky to have cinnamon color pine needles from two pine trees in the property. They do put out a ton of them. Also it saves us money as we don’t have to buy too many bags of mulch. Bagged cinnamon pine needles are expensive, so I am very grateful to have them available here. A box of pine needles that might cover 240 sf will cost about $135 dollars.
While cleaning up the rest of the garden and removing a few weeds, I find expected seasonal gifts, such as the changing of the leaves on this shrub and the beautiful berries it puts out every year. This is one of the trees we uncovered and saved when we first started bringing life back into this garden. It will become an orange-red color. During the spring, it turns back to green and instead of berries it puts out cluster of sprigs with tiny flowers.
While cleaning up the garden, I also found the unseasonably unexpected – new flowers on the forsythia bush and a few buds. Is this a sign of a mild winter ahead? Last year, we had a mild winter and this bush flourished very early.
By the time we had our lunch break, and finally, we were both done with our chores, it had become dark and our reward was awaiting to be enjoyed.